
These insanely cute DIY handmade Christmas card ideas are perfect for kids, friends, family members, teachers, and anyone who loves adding a personal touch to holiday gifting.
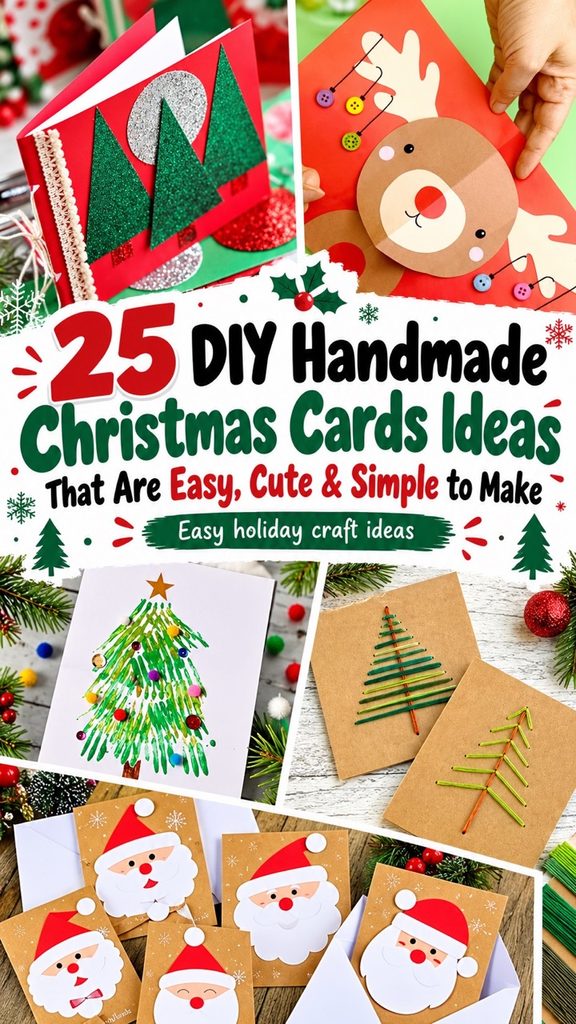
Many of these DIY Christmas cards use basic craft supplies you may already have at home, making them great for school projects, family craft nights, or a cozy December afternoon with the kids.
You’ll find easy handmade Christmas cards for moms, grandparents, friends, classmates, and loved ones, plus simple designs children can actually help make.
If you’re looking for cute handmade Christmas card ideas for kids and family, this collection gives you plenty of festive inspiration without making the project feel complicated.
These cards also make thoughtful keepsakes and a fun way to make holiday greetings feel more personal.
Making your own Christmas cards does not have to be hard or expensive.
Most of these use simple supplies like cardstock, glue, markers, washi tape and buttons that you probably already have.
Some are easy enough for kids to make, and a few take a little more time for when you want something extra special.
Pick one design and make a whole batch, or mix a few styles for different people on your list.
YOU MIGHT ALSO LIKE
- 25 Amazing DIY Christmas Gift Basket Ideas That Are Perfect for Anyone
- 25 Adorable Mason Jar Christmas Gift Ideas With Food, Cookies, Candy & Treats
- 25 Adorable Kids Christmas Eve Basket Ideas Everyone Will Love
- 30 Amazing Christmas Food Gift Ideas Everyone Will Actually Want
- 25 Creative Christmas Snowman Treats Everyone Will Love
DIY Christmas Card Ideas
1. Button Christmas Tree Card
Colorful buttons glued in a triangle shape make an easy little Christmas tree.
It is a great way to use up the loose buttons in your craft drawer.
Kids love picking out the button colors.
What You Need
- Folded cardstock card (5×7 or A2 size)
- 15 to 20 small buttons in mixed colors
- 1 small star button or sticker
- Brown marker or paper strip for the trunk
- Craft glue
How to Make It
- Draw a light pencil triangle on the front of the card as a guide.
- Glue the buttons inside the triangle, starting with the bottom row.
- Add a brown trunk under the tree.
- Glue the star at the top.
- Write a message underneath and let the glue dry flat.
2. Pop-Up Christmas Tree Card
This card has a 3D tree that pops up when you open it.
It looks impressive but only needs a few simple cuts.
Make the tree from green patterned paper for extra color.
What You Need
- 2 sheets of cardstock in different colors
- Green patterned paper
- Scissors or craft knife
- Ruler
- Glue stick
How to Make It
- Fold one sheet of cardstock in half and cut 3 pairs of slits along the fold at different lengths.
- Push the cut tabs inward to make the pop-up steps.
- Cut 3 tree layers from green paper and glue one to each step.
- Glue the inside card into a second folded card so the cuts are hidden.
- Decorate the front and write your message.
💡 Tip: Make the bottom tab the longest so the tree has a wide base.
3. Watercolor Christmas Tree Card
Soft watercolor trees look pretty and calm on a white card.
You do not need to be an artist since loose brush strokes look best.
Add a little gold pen or glitter on top for sparkle.
What You Need
- Watercolor paper cut to card size
- Watercolor paints
- A small round brush
- Gold gel pen
- White cardstock card base
- Double-sided tape
How to Make It
- Paint simple triangle trees with quick, loose strokes in green, blue or purple.
- Let the paint dry completely.
- Add a gold star and tiny dots with the gold pen.
- Tape the painted panel onto the front of the card base.
- Write a short greeting under the trees.
4. Fingerprint Christmas Lights Card
Little fingerprints turn into colorful Christmas lights on a string.
It is one of the easiest cards for toddlers and young kids.
Grandparents love getting these every year.
What You Need
- Folded cardstock card (5×7 or A2 size)
- Washable paint or ink pads in bright colors
- Black fine-tip marker
- Baby wipes for clean up
How to Make It
- Draw a wavy line across the card with the black marker.
- Press a finger into the paint and print a light along the line.
- Repeat with different colors, spacing them out.
- Let the paint dry.
- Draw a tiny black base on top of each light.
5. Washi Tape Christmas Tree Card
Strips of washi tape in different lengths stack up into a modern tree.
There is no glue or mess, which makes it quick to make in big batches.
Mix patterns and colors for a fun look.
What You Need
- Folded cardstock card (5×7 or A2 size)
- 3 to 5 rolls of Christmas washi tape
- Star sticker or gold paper star
- Scissors
How to Make It
- Cut strips of washi tape, starting long and getting shorter.
- Stick them across the card from the bottom up to form a tree.
- Trim the ends at an angle.
- Add a star sticker at the top.
- Add a small strip of brown tape as a trunk.
⚠️ Budget Note: One roll of washi tape can make 20 or more cards, so this is one of the cheapest ideas on the list.
6. Twig Reindeer Card
Real twigs make the antlers on this rustic reindeer card.
Kraft paper and a red pom pom nose give it a farmhouse feel.
Gather small twigs on your next walk outside.
What You Need
- Kraft cardstock card
- Small thin twigs
- Brown paper for the head
- Googly eyes
- Red pom pom
- Hot glue or strong craft glue
How to Make It
- Cut an oval reindeer head from brown paper and glue it to the card.
- Glue two small twigs at the top for antlers.
- Add the googly eyes.
- Glue the red pom pom as the nose.
- Write a greeting along the bottom.
7. Easy Snowman Card
Two white circles and a few details make a cheerful snowman.
Use a scrap of fabric or ribbon for his scarf.
This is a fun card for kids to make for classmates.
What You Need
- Blue or red cardstock card
- White cardstock
- Orange paper
- Black marker
- Small piece of ribbon
- Glue stick
How to Make It
- Cut two white circles, one bigger than the other.
- Glue them to the card to make the snowman’s body and head.
- Draw eyes, a smile and buttons with the black marker.
- Glue on a small orange triangle for the nose.
- Tie or glue a short ribbon scarf around his neck.
8. Ornament Shaker Card
A clear window filled with sequins shakes like a little snow globe.
People always shake these the second they open them.
Use red, gold or silver sequins to match the season.
What You Need
- Folded cardstock card (5×7 or A2 size)
- Patterned cardstock
- Clear acetate or a clear plastic sheet
- Foam tape
- Sequins or small beads
- Circle punch or scissors
- Glue
How to Make It
- Cut an ornament shape from patterned paper and cut a circle window in the middle.
- Glue acetate to the back of the window.
- Add foam tape around the window on the back.
- Pour sequins in the middle and press the ornament onto the card front.
- Add a small ornament cap and string on top.
💡 Tip: Rub a dryer sheet over the acetate so the sequins do not stick to it.
9. Quilled Christmas Card
Paper quilling uses rolled strips of paper to make raised designs.
Simple coils can make a wreath, tree or ornament.
It takes some patience but looks very special.
What You Need
- Folded cardstock card (5×7 or A2 size)
- Quilling paper strips in red, green and white
- Quilling tool or toothpick
- Craft glue
- Tweezers
How to Make It
- Roll paper strips tightly around the tool and let them loosen a little.
- Glue the ends to make coils.
- Pinch some coils into teardrop or leaf shapes.
- Arrange them on the card to make a wreath or tree.
- Glue each piece down and let dry.
10. Embroidered Christmas Card
Stitching on cardstock gives a card a cozy, handmade texture.
Simple shapes like a tree, star or ornament work best.
Poke the holes first so the stitching is easy.
What You Need
- Folded cardstock card (5×7 or A2 size)
- Embroidery floss
- Needle
- Pushpin
- Pencil
- Tape
How to Make It
- Lightly draw a simple shape on the card front.
- Poke holes along the lines with a pushpin about 1/4 inch apart.
- Stitch through the holes with embroidery floss.
- Tape the ends of the thread inside the card.
- Glue a blank paper liner inside to cover the back of the stitching.
11. Sheet Music Glitter Ornament Card
Old sheet music cut into ornament shapes looks vintage and pretty.
A little glitter around the edges makes it sparkle.
Tie on a tiny ribbon bow for the ornament hanger.
What You Need
- Folded cardstock card (5×7 or A2 size)
- Old sheet music or book pages
- Glitter
- Glue
- Thin ribbon
- Circle template
How to Make It
- Trace and cut ornament circles from the sheet music.
- Brush glue around the edge and sprinkle with glitter.
- Shake off the extra glitter.
- Glue the ornaments to the card.
- Draw strings and add small ribbon bows on top.
12. Simple Kraft Paper Card
Brown kraft paper with white ink has a clean, Scandinavian look.
You only need a white gel pen and some simple doodles.
It is perfect if you want elegant cards without a lot of supplies.
What You Need
- Kraft cardstock card
- White gel pen
- Red twine (optional)
- Gold or red sticker
How to Make It
- Draw simple pine branches, snowflakes or trees with the white pen.
- Write a short greeting in the middle.
- Tie a bit of red twine around the fold.
- Add a small sticker as an accent.
- Let the ink dry before stacking.
13. Pressed Flower Christmas Card
Pressed greenery and flowers make a natural, earthy card.
Use small sprigs of fern, pine or dried flowers.
Each card is one of a kind since no two plants look the same.
What You Need
- Folded cardstock card (5×7 or A2 size)
- Pressed flowers or greenery
- Clear-drying glue
- Tweezers
- Gold pen
How to Make It
- Press flowers between heavy books for 1 to 2 weeks.
- Arrange the pieces on the card front in a wreath or small bouquet.
- Glue each piece down with a thin layer of glue.
- Let dry flat under a book.
- Write a greeting with the gold pen.
14. Gingerbread Man Card
A cut-out gingerbread man with white icing lines looks good enough to eat.
Kids can decorate him with buttons, sequins or stickers.
Use brown or kraft cardstock for the cookie.
What You Need
- Folded cardstock card (5×7 or A2 size)
- Brown cardstock
- Gingerbread man template
- White paint pen
- Small buttons or pom poms
How to Make It
- Trace and cut a gingerbread man from brown cardstock.
- Draw icing squiggles on the arms and legs with the white paint pen.
- Add a face and glue small buttons down his middle.
- Glue him onto the front of the card.
- Write a sweet message like ‘Sweet Christmas Wishes’.
15. Santa Card
A simple Santa face or belly makes a fun, bright card.
Red paper with a black belt and gold buckle is easy to make.
It is quick to make lots of these for a class or office.
What You Need
- Red cardstock card
- Black paper strip
- Gold or yellow paper
- White cardstock or cotton balls
- Glue stick
How to Make It
- Glue a black paper strip across the middle of the red card.
- Cut a small gold square and a smaller black square for the buckle.
- Glue the buckle onto the belt.
- Glue a white strip or cotton along the bottom as fur.
- Write ‘Ho Ho Ho’ inside.
16. Honeycomb Tissue Tree Card
A folded honeycomb paper tree opens up into 3D when the card is opened.
It looks like it came from a fancy store.
Honeycomb paper sheets are easy to find at craft stores.
What You Need
- Folded cardstock card (5×7 or A2 size)
- Green honeycomb tissue paper
- Tree template
- Glue stick
- Small star sticker
How to Make It
- Cut half a tree shape from honeycomb paper, keeping the folded edge flat.
- Glue one side of the tree inside the card along the fold.
- Glue the other side to the opposite page.
- Close the card and press so the glue sets.
- Open the card to check the tree pops into shape and add a star on top.
17. Stamped Snowflake Card
Snowflake stamps in white or silver look elegant on blue or gray cards.
You can stamp a whole batch of cards in one sitting.
A touch of glitter glue makes them look icy.
What You Need
- Blue or gray cardstock card
- Snowflake rubber stamps
- White or silver ink pad
- Glitter glue (optional)
How to Make It
- Ink the stamp and press firmly on the card.
- Repeat in different sizes across the front.
- Let some snowflakes run off the edges.
- Add dots of glitter glue in the centers.
- Let dry before writing inside.
18. Christmas Sweater Card
A paper cut-out sweater decorated with fun patterns makes a silly, cute card.
Use pom poms, sequins and markers to make it as ugly or cute as you like.
This is a great one for friends and coworkers.
What You Need
- Folded cardstock card (5×7 or A2 size)
- Colored cardstock
- Sweater template
- Small pom poms
- Sequins and stickers
- Markers
- Glue
How to Make It
- Trace and cut a sweater shape from colored cardstock.
- Draw stripes, zigzags or snowflakes with markers.
- Glue on pom poms and sequins.
- Glue the sweater to the card front.
- Write a fun message like ‘Have an Ugly Little Christmas’.
19. Button Penguin Card
A little penguin made from black and white paper with button details.
Add a tiny scarf and hat for a cozy look.
It is a sweet card for kids and penguin lovers.
What You Need
- Light blue cardstock card
- Black and white cardstock
- Orange paper
- Googly eyes
- 2 small buttons
- Glue
How to Make It
- Cut a black oval for the body and a smaller white oval for the belly.
- Glue the white belly onto the black body.
- Add googly eyes and a small orange beak.
- Glue two buttons down the belly.
- Glue the penguin onto the card and add snow dots with a white pen.
20. Hot Cocoa Mug Card
A paper mug full of tiny marshmallows makes a warm, cozy card.
Pair it with a hot cocoa packet tucked inside for a fun gift.
White pom poms or paper circles work for the marshmallows.
What You Need
- Folded cardstock card (5×7 or A2 size)
- Red or patterned paper
- Brown paper
- Small white pom poms
- Glue
- Hot cocoa packet (optional)
How to Make It
- Cut a mug shape from red paper and a handle.
- Cut a brown oval for the cocoa and glue it at the top of the mug.
- Glue small white pom poms on top as marshmallows.
- Glue the mug onto the card.
- Write ‘Warm Wishes’ and tape a cocoa packet inside.
21. Snow Globe Card
A circle window and a little scene inside make a card that looks like a snow globe.
White dots or fake snow give it a winter feel.
Put a family photo inside the globe for a personal touch.
What You Need
- Folded cardstock card (5×7 or A2 size)
- White cardstock
- Clear acetate
- Small tree or house cut-outs or a photo
- White paint pen
- Brown paper for the base
- Glue
How to Make It
- Cut a circle window in the front of the card.
- Glue acetate behind the window.
- Glue a small scene or photo inside the card so it shows through the window.
- Add white dots on the acetate for snow.
- Glue a brown base under the circle.
22. Hand-Lettered Christmas Card
A simple ‘Merry Christmas’ in pretty lettering can be a whole design.
Practice a few times on scrap paper first.
Add a few leaves or berries around the words.
What You Need
- White or cream cardstock card
- Brush pen or fine marker
- Pencil
- Eraser
- Green and red pens for accents
How to Make It
- Lightly write the greeting in pencil.
- Trace over it with the brush pen, pressing harder on down strokes.
- Let the ink dry and erase the pencil lines.
- Draw small leaves and berries around the words.
- Add a little color with the green and red pens.
23. 3D Felt Christmas Tree Card
Felt layers stacked into a tree give this card a soft, 3D look.
Felt is easy to cut and does not fray.
Add tiny bead or sequin ornaments.
What You Need
- Folded cardstock card (5×7 or A2 size)
- Green felt in 2 shades
- Small beads or sequins
- Brown felt
- Craft glue
How to Make It
- Cut 3 or 4 felt tree layers in different sizes.
- Glue the layers on top of each other, slightly offset.
- Glue a brown felt trunk to the card and add the tree on top.
- Glue beads or sequins on as ornaments.
- Let dry flat before writing inside.
24. Origami Star Card
A folded paper star on the front makes a simple, elegant card.
Use gold, silver or patterned paper for the star.
It is a nice choice for a minimalist look.
What You Need
- Dark blue or white cardstock card
- Square origami paper
- Glue dots
- Silver pen
How to Make It
- Fold a paper star by following an origami star tutorial.
- Press the folds flat with your nail.
- Glue the star to the front of the card.
- Draw tiny stars or dots around it with the silver pen.
- Write a greeting under the star.
25. Fingerprint Wreath Card
Green fingerprints in a circle form a wreath, with red dots as berries.
It is a great card for the whole family to help make.
A small red bow at the top finishes it off.
What You Need
- Folded cardstock card (5×7 or A2 size)
- Green and red washable paint or ink
- Small red ribbon bow
- Pencil
- Glue
How to Make It
- Draw a light pencil circle as a guide.
- Press green fingerprints around the circle, overlapping a little.
- Add small red fingerprints or dots as berries.
- Let the paint dry.
- Glue a small red bow at the top.
26. Light-Up Christmas Card
A tiny LED light and coin battery make part of this card glow.
Kids think it is magic, and it is a fun little science lesson too.
Use it to light up a star on top of a tree or a candle.
What You Need
- Folded cardstock card (5×7 or A2 size)
- 1 small LED light
- 1 coin cell battery (CR2032)
- Copper tape
- Clear tape
- Printed or drawn tree design
How to Make It
- Draw or print a tree on the card and poke a hole where the star goes.
- Push the LED through the hole from the inside.
- Run copper tape from each LED leg to where the battery will sit.
- Tape the battery in place so one side touches each tape line.
- Press the corner to close the circuit and make the light glow.
💡 Tip: Keep coin batteries away from small children, since they are dangerous if swallowed.
27. Handprint Christmas Tree Card
Green handprints stacked upside down make a sweet Christmas tree.
It is a lovely keepsake card to send to grandparents.
Add the child’s name and year on the back.
What You Need
- Folded cardstock card (5×7 or A2 size)
- Green washable paint
- Paint brush
- Sequins or small stickers
- Yellow star sticker
How to Make It
- Paint your child’s hand green.
- Press it on the card with fingers pointing down.
- Repeat to make 2 or 3 layers of tree.
- Let dry and add sequins as ornaments.
- Stick a star on top and write the name and year.
28. Origami Christmas Tree Card
A folded paper tree sits on the front of the card in 3D.
Use double-sided patterned paper so both sides look nice.
It only takes a few minutes once you learn the folds.
What You Need
- Folded cardstock card (5×7 or A2 size)
- Square patterned paper
- Glue dots
- Small star sticker
How to Make It
- Fold the square paper in half diagonally both ways and unfold.
- Fold accordion pleats to make a fan.
- Fold the fan into a triangle tree shape.
- Glue the tree to the card front.
- Add a star sticker on top.
29. Christmas Doodle Card
Simple doodles of leaves, berries, ornaments and stars fill the front of this card.
You only need a black pen and a few colored markers.
It is relaxing to make and every card turns out a little different.
What You Need
- White cardstock card
- Black fine-tip pen
- Red, green and gold markers
- Pencil
How to Make It
- Lightly write ‘Merry Christmas’ in the middle with pencil.
- Trace the words with the black pen.
- Doodle leaves, berries, stars and small ornaments around the words.
- Color some of the doodles with markers.
- Erase any pencil lines once the ink is dry.
30. DIY Polaroid Photo Christmas Card
A family photo in a white paper frame looks like an instant camera print.
Write a short note on the bottom strip like a real photo.
It is a nice way to share a family picture without ordering printed cards.
What You Need
- Folded cardstock card (5×7 or A2 size)
- Printed photo (about 3×3 inches)
- White cardstock
- Black marker
- Washi tape or mini clothespin
How to Make It
- Cut a white frame with a wider strip at the bottom.
- Glue the photo inside the frame.
- Write a message or the year on the bottom strip.
- Attach the photo to the card with washi tape or a mini clothespin.
- Add a small greeting above or below the photo.