Kids love being outside, but long stretches at a campsite can quickly turn into “I’m bored” moments. Parents need activities that are simple, engaging, and don’t require a ton of gear. Most craft ideas fail because they’re either too complicated or impossible to do outdoors.
That’s where these 15 camping crafts for kids come in. Each project uses easy-to-find materials, like sticks, rocks, leaves, or basic supplies you can pack in a backpack.
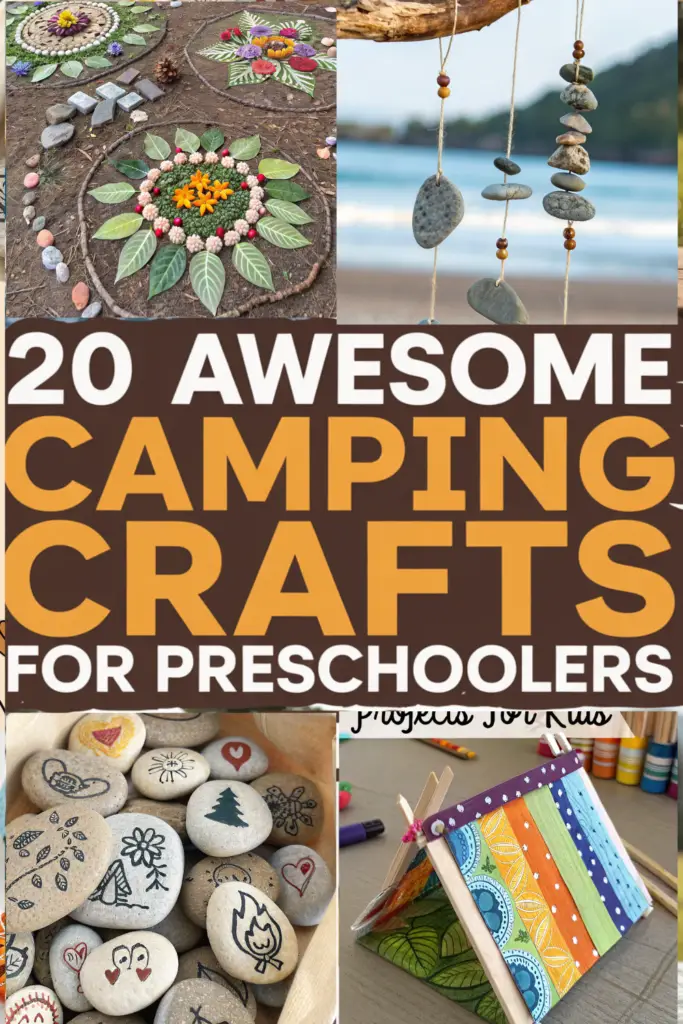
From painting rocks and decorating walking sticks to making story stones or friendship bracelets, these crafts keep kids entertained and connected to nature. They’re designed for real camping situations—minimal setup, minimal mess, and maximum fun.
And here’s why that matters: keeping kids busy and creative means more relaxed, enjoyable camping for the whole family. These crafts aren’t just fun—they give children a chance to make memories, practice skills, and take home keepsakes from their adventure.
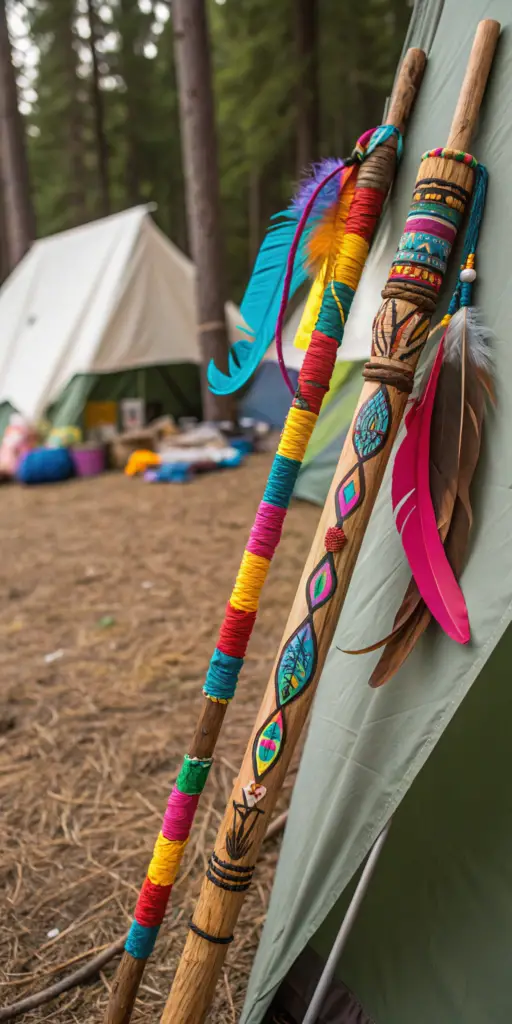
1. Decorate Walking Sticks
Walking sticks are more than just a hiking aid—they’re a chance for kids to get creative and personalize their campsite gear. Decorating walking sticks keeps children engaged while also giving them a functional item they can use on hikes. A
nd here’s why that matters: kids are more likely to walk confidently and safely when they have a stick that feels like their own.
Things Needed:
- Sturdy sticks (about waist height for the child)
- Sandpaper (to smooth rough edges)
- Acrylic paints or markers
- String, yarn, or washi tape
- Feathers or small charms (optional)
How to Make:
- Choose a stick that feels comfortable to hold. Sand down any rough spots or splinters.
- Paint the stick with bright colors, patterns, or designs. Allow it to dry.
- Wrap sections with yarn, string, or tape for added decoration.
- Attach feathers or charms at the top using string or glue.
- Let the stick dry completely before using it on hikes or around the campsite.
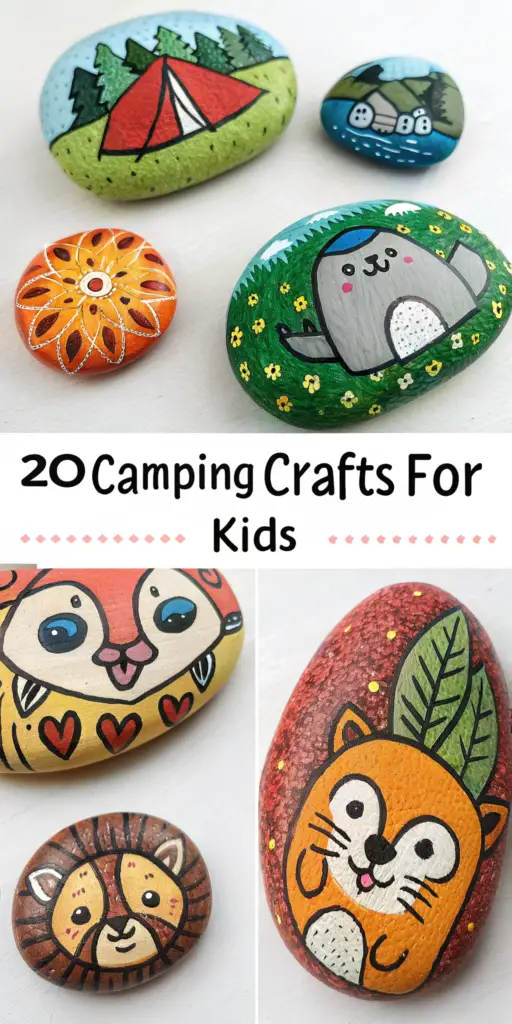
2. Rock Painting
Rock painting is a classic craft that’s perfect for campsites. Kids can create pet rocks, decorative patterns, or little nature-inspired masterpieces.
And here’s why that matters: this activity encourages creativity without needing fancy supplies, and the painted rocks make fun keepsakes or gifts for friends and family.
Things Needed:
- Smooth, flat rocks
- Acrylic paints or paint markers
- Brushes or sponges
- Sealant spray (optional, for durability)
How to Make:
- Collect smooth rocks from the campsite or bring a set from home.
- Wash and dry the rocks to remove dirt and debris.
- Paint designs, patterns, or faces on the rocks. Kids can make animals, geometric shapes, or fun abstract designs.
- Allow paint to dry completely.
- Spray a clear sealant if you want the rocks to last outdoors or for display at home.
3. Friendship Bracelets
Friendship bracelets are a hands-on craft that lets kids create wearable keepsakes while practicing fine motor skills.
And here’s why that matters: tying bracelets helps children focus, encourages patience, and provides a meaningful souvenir they can trade or gift to friends.
Things Needed:
- Embroidery floss, yarn, or thin ribbon
- Scissors
- Tape or clip to hold the bracelet in place while braiding
How to Make:
- Cut strands of floss or yarn, each about 24 inches long.
- Secure the top of the strands with tape or a clip to a flat surface.
- Braid or knot the strands using a simple pattern, like a three-strand braid or a chevron design.
- Add beads or charms for extra decoration if desired.
- Tie the ends securely and trim any excess. Bracelets can be worn immediately or gifted to friends.
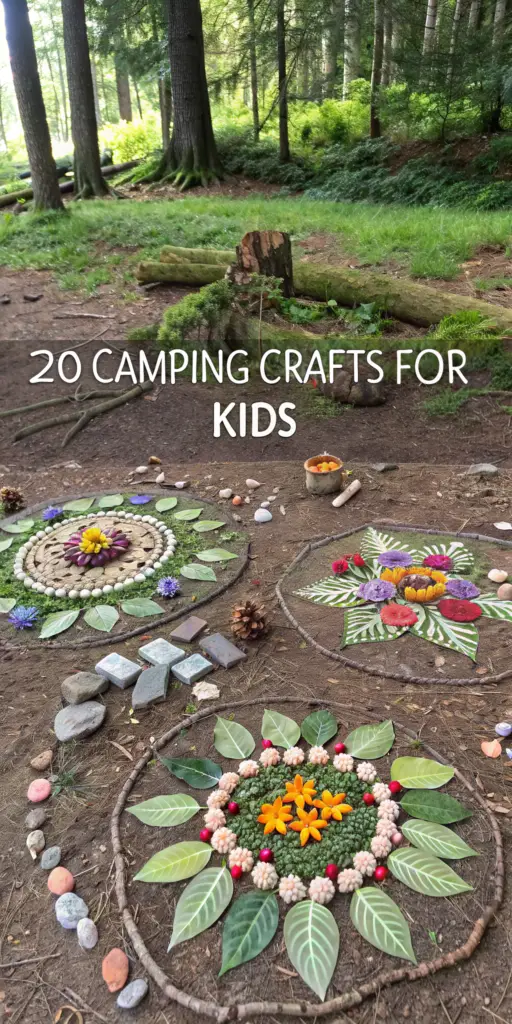
4. Nature Mandalas
Nature mandalas are creative designs made directly on the ground using natural materials. Kids arrange leaves, stones, flowers, and other items into circular patterns.
And here’s why that matters: this craft encourages mindfulness, observation, and a connection to the environment without needing any tools or cleanup.
Things Needed:
- Leaves, stones, flowers, pinecones, or small twigs
- Flat area on the ground for the mandala
How to Make:
- Find a flat, clean spot at the campsite to build your mandala.
- Collect natural items from around the campsite, being mindful not to disturb wildlife.
- Start in the center and arrange items in a circular pattern, radiating outward.
- Layer different colors, shapes, and textures for variety.
- Take photos to remember your mandala before leaving it to return naturally to the environment.
5. Leaf Rubbing Collage
Leaf rubbing collages allow kids to explore textures, shapes, and patterns in nature. And here’s why that matters: it’s a simple way to combine art and science while encouraging children to observe details in their surroundings.
Things Needed:
- Paper (plain white or colored)
- Crayons or colored pencils
- Leaves of various sizes and shapes
How to Make:
- Place a leaf vein-side up under a sheet of paper.
- Rub a crayon or colored pencil gently over the paper to reveal the leaf’s texture.
- Repeat with different leaves and colors to create a full collage.
- Arrange the rubbings to make patterns, shapes, or even a nature scene.
- Display the collage at the campsite or take it home as a keepsake.
6. DIY Binoculars
Kids love exploring the outdoors, and DIY binoculars make that adventure even more exciting. And here’s why that matters: creating their own binoculars encourages imaginative play and observation skills while keeping them entertained during hikes or campsite adventures.
Things Needed:
- Two empty toilet paper rolls
- Tape or glue
- Yarn or string (for a neck strap)
- Stickers, markers, or paints for decoration
How to Make:
- Tape or glue the two toilet paper rolls together side by side.
- Attach a piece of yarn or string to create a neck strap.
- Decorate the binoculars with markers, stickers, or paint.
- Let decorations dry before using.
- Kids can use their binoculars to spot birds, animals, or scenic views around the campsite.
7. Campfire Story Stones
Campfire story stones turn ordinary rocks into storytelling tools, perfect for engaging kids during downtime by the fire. And here’s why that matters: these stones spark creativity, encourage narrative skills, and can become a fun family activity.

Things Needed:
- Small, smooth stones
- Acrylic paints or paint markers
- Storage bag for carrying
How to Make:
- Paint simple images or symbols on the stones (like tents, stars, animals, or trees).
- Let the paint dry completely.
- Place stones in a bag and use them to inspire storytelling by drawing one stone at a time.
- Encourage kids to weave the symbols into a story or take turns adding elements.
- Store stones in the bag to reuse for future camping trips.
8. Nature Weaving
Nature weaving is a hands-on craft that lets kids combine creativity with natural materials. And here’s why that matters: weaving encourages fine motor skills, concentration, and artistic expression while giving kids a tactile connection to the outdoors.
Things Needed:
- Sticks (to make a simple frame)
- String or yarn
- Leaves, grass, flowers, or feathers
How to Make:
- Create a basic loom by tying strings vertically between two sticks.
- Weave leaves, grass, flowers, or feathers horizontally through the strings.
- Adjust items to create patterns, colors, or textures.
- Secure the ends of the weaving and display it at the campsite.
- When finished, children can take photos or leave the weaving as a natural decoration.
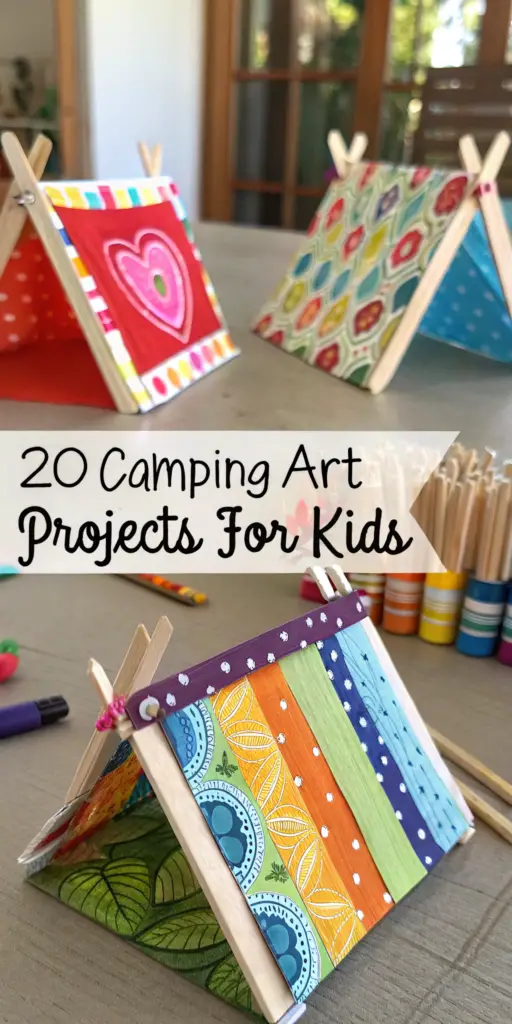
9. Popsicle Stick Tents
Popsicle stick tents let kids design miniature campsite models, combining building and decorating in one craft. And here’s why that matters: this activity fosters spatial awareness, creativity, and imaginative play.
Things Needed:
- Popsicle sticks
- Glue (non-toxic)
- Fabric scraps or colored paper for tent coverings
- Markers or stickers for decoration
How to Make:
- Glue popsicle sticks together to form a triangular or A-frame tent structure.
- Add a base by gluing additional sticks flat on the ground.
- Decorate with fabric, paper, or markers to make the tent colorful.
- Allow glue to dry completely before playing.
- Kids can use the tiny tents for toy figures or as part of a campsite diorama.
10. Suncatchers
Suncatchers transform natural elements into bright, colorful decorations that capture sunlight. And here’s why that matters: making suncatchers encourages observation of color, texture, and light, while giving kids a creative project they can display.

Things Needed:
- Clear contact paper or laminating sheets
- Leaves, flower petals, or small natural items
- Scissors
- Ribbon or string for hanging
How to Make:
- Cut a piece of contact paper and peel off the backing.
- Arrange leaves, petals, or small items on the sticky side.
- Cover with another piece of contact paper or laminate to seal the items.
- Cut into shapes if desired and punch a hole for hanging.
- Use ribbon or string to hang the suncatcher where sunlight can shine through.
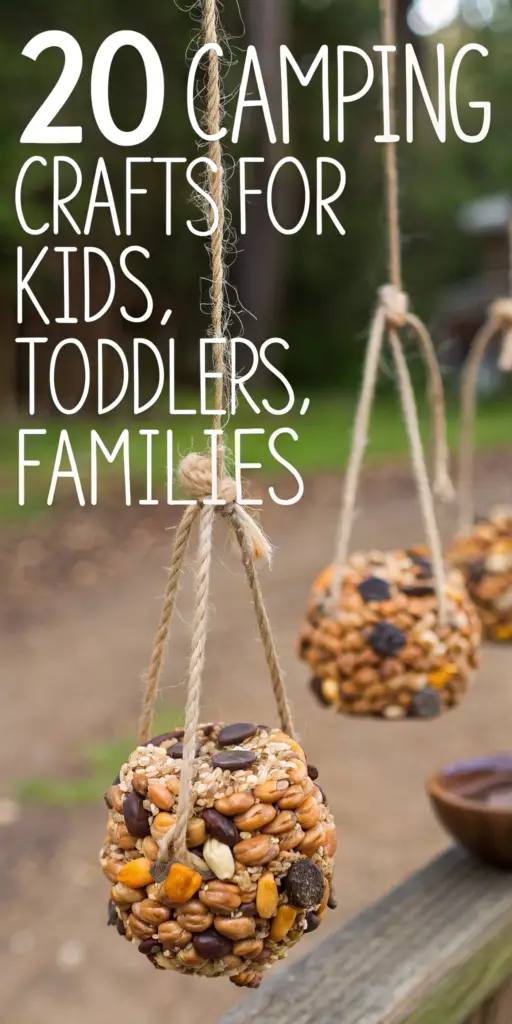
11. Bird Feeder Craft
Bird feeder crafts let kids connect with nature while helping wildlife. And here’s why that matters: this project encourages responsibility, observation skills, and outdoor appreciation as kids watch birds visit their feeders.
Things Needed:
- Pine cones or empty ice cream cones
- Peanut butter or sunflower seed butter
- Birdseed
- Twine or string for hanging
How to Make:
- Spread peanut butter evenly over the pine cone or cone surface.
- Roll or sprinkle birdseed over the sticky areas.
- Tie twine or string to the top for hanging.
- Hang the feeder from a tree branch or hook near your campsite.
- Encourage kids to watch and identify visiting birds during the trip.
12. Nature Pinch Pots
Nature pinch pots are small clay projects that incorporate natural textures. And here’s why that matters: creating pinch pots builds fine motor skills, sensory engagement, and a tangible memory of the camping trip.
Things Needed:
- Air-dry clay
- Leaves, small stones, or flowers for pressing
- Small tool or stick for shaping
How to Make:
- Take a small piece of air-dry clay and roll it into a ball.
- Press your thumb into the center to create a small bowl.
- Decorate by pressing leaves, stones, or flowers into the clay surface.
- Let the clay dry completely according to instructions.
- Use pots to hold small treasures or as decorative souvenirs from the trip.
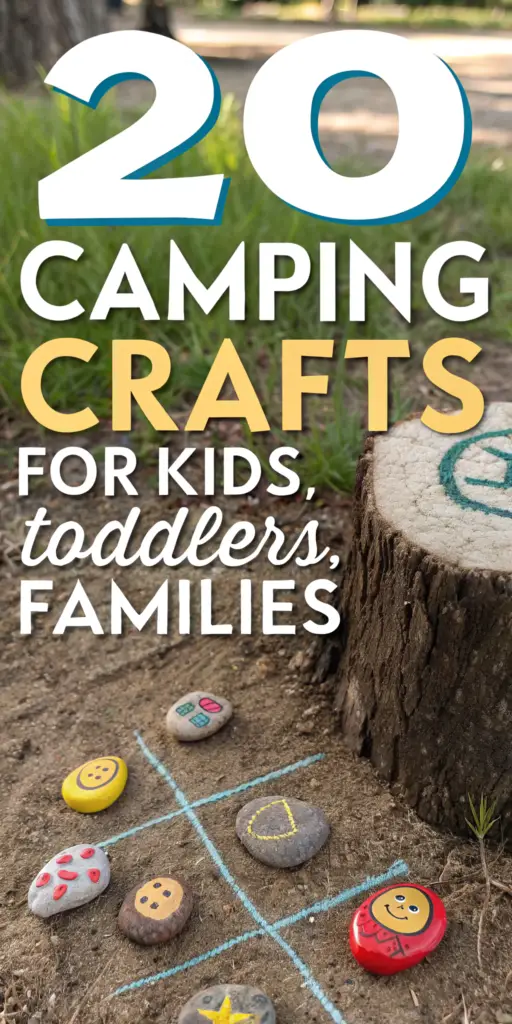
13. Pet Rock Tic-Tac-Toe
Pet rock tic-tac-toe turns ordinary stones into a fun, reusable game for outdoor play. And here’s why that matters: it encourages strategic thinking, creativity, and social interaction around the campsite.
Things Needed:
- 10–12 small, smooth rocks
- Acrylic paints (two contrasting colors)
- Marker or chalk to draw the grid on a tree stump or dirt
How to Make:
- Paint half of the rocks one color and the other half a different color.
- Let the paint dry completely.
- Draw a tic-tac-toe grid on the ground, dirt, or a flat tree stump.
- Use the rocks to play the game in turns.
- Store painted rocks in a bag for repeat use on future trips.
14. Paper Lantern Craft
Paper lantern crafts add a warm glow to a campsite while offering kids a creative outlet. And here’s why that matters: this project encourages design skills and provides a safe alternative to open flames at night.
Things Needed:
- Colored paper or cardstock
- Tape or glue
- Scissors
- LED tealight or small battery light
How to Make:
- Fold paper into a rectangle and cut slits along one side.
- Roll the paper into a cylinder and secure with tape or glue.
- Place the LED tealight inside the paper cylinder.
- Decorate with markers, stickers, or additional paper cutouts.
- Arrange lanterns around the campsite for a safe, cozy glow.
15. Camp Sign or Banner
Creating a camp sign or banner helps kids personalize the campsite. And here’s why that matters: this craft fosters pride, teamwork, and creativity while adding a fun visual element to their outdoor space.
Things Needed:
- Cardboard or fabric
- Paint, markers, or crayons
- Sticks for stakes
- String or tape
How to Make:
- Cut cardboard or fabric to desired banner size.
- Paint or draw a welcome message, campsite name, or fun slogan.
- Attach sticks to the ends for display or use string to hang it.
- Place the banner near the tent or campsite entrance.
- Encourage kids to take photos with their sign as a keepsake.
16. Nature Collage on Canvas
Nature collages turn found objects into personalized artwork. And here’s why that matters: kids learn to observe textures, shapes, and colors in nature, while creating a lasting keepsake from their trip.
Things Needed:
- Small canvas or cardboard
- Glue (non-toxic)
- Leaves, twigs, flowers, small stones
- Optional: markers or paint for accents
How to Make:
- Collect natural items from around the campsite.
- Arrange items on the canvas in any design—abstract, landscape, or patterns.
- Glue each piece in place carefully.
- Let the collage dry completely.
- Add finishing touches with markers or paint if desired.
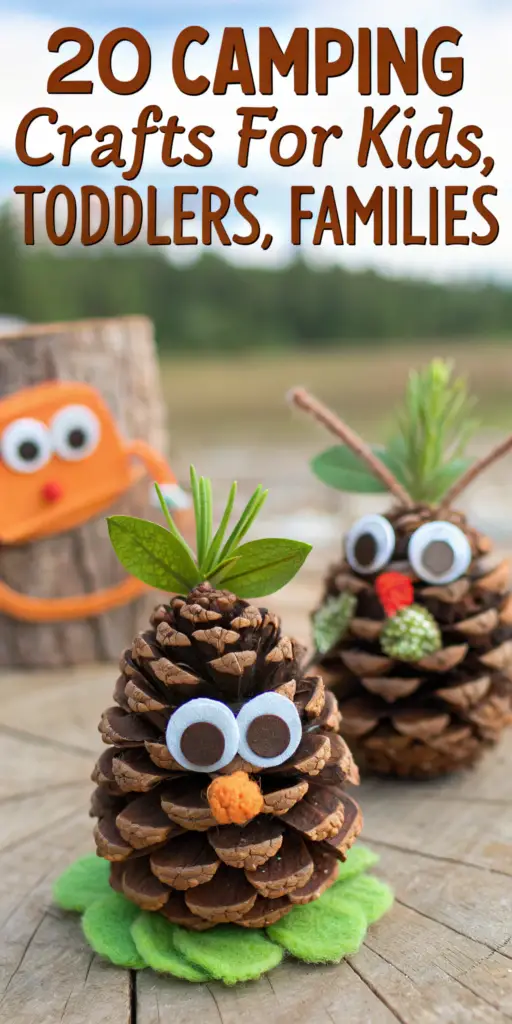
17. Pinecone Critters
Pinecone critters are simple yet imaginative creatures. And here’s why that matters: this craft encourages storytelling and imaginative play, perfect for downtime at the campsite.
Things Needed:
- Pinecones
- Googly eyes
- Pipe cleaners
- Glue
- Optional: felt scraps, small pom-poms
How to Make:
- Attach googly eyes to the pinecone with glue.
- Use pipe cleaners for legs, antennae, or wings.
- Add felt or pom-poms for extra features.
- Let the glue dry fully before handling.
- Encourage kids to name their critters and include them in camp stories.
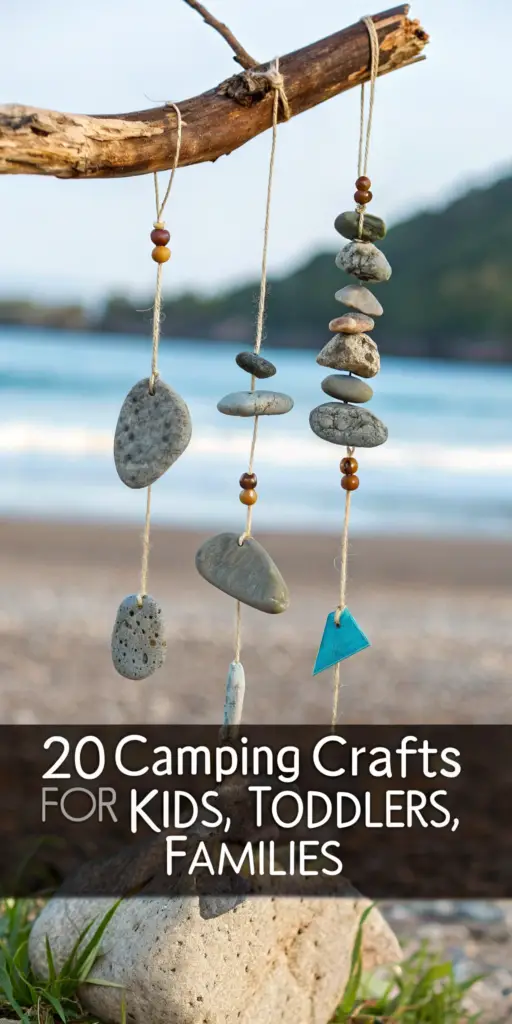
18. Rock Wind Chimes
Rock wind chimes create gentle sounds while reusing natural materials. And here’s why that matters: kids learn about sound and rhythm while adding decoration to the campsite.
Things Needed:
- Small, flat rocks
- Twine or fishing line
- Driftwood or a sturdy stick
- Drill or hole punch (optional for stringing)
How to Make:
- Drill small holes in the rocks if possible, or tie twine around them securely.
- Attach the rocks to lengths of twine.
- Tie each string to a driftwood piece or stick.
- Hang the chime where wind can reach it.
- Watch how the rocks create natural music as the wind moves.
19. Nature-Inspired Bookmarks
Bookmarks are a practical craft that also captures nature’s beauty. And here’s why that matters: kids create a keepsake they can use with books during and after the camping trip.
Things Needed:
- Cardstock or thick paper
- Leaves, small flowers
- Laminating sheets or clear contact paper
- Markers or stickers
How to Make:
- Place a leaf or small flower between two layers of cardstock.
- Cover with laminating sheets or clear contact paper.
- Trim edges neatly.
- Decorate with markers or stickers.
- Use bookmarks during reading sessions at camp or at home.
20. Nature Bracelet
Nature bracelets are wearable keepsakes made from items found outdoors. And here’s why that matters: kids engage with the environment creatively while building fine motor skills.
Things Needed:
- Wide masking tape or duct tape (sticky side out)
- Small leaves, petals, or flower buds
How to Make:
- Cut a strip of tape long enough to wrap around the wrist.
- With sticky side facing out, press leaves or petals onto the tape.
- Wrap the tape around the wrist to fit comfortably.
- Press ends together to secure.
- Kids can show off their wearable nature art throughout the trip.

Hi, I’m Sabah — the cook behind grillcuisines! I share easy, family-friendly recipes made with love and simple ingredients.