When you’re craving something sweet but want to keep things simple, no-bake desserts come to the rescue—especially when you’re gluten-free.
These no-bake dessert treats not only save your time in the kitchen, but they also eliminate the hassle of turning on the oven. Whether you’re managing a gluten intolerance or simply choosing to cut back on gluten, this collection of 20 gluten-free no-bake desserts offers a variety of indulgent options that will satisfy any sweet tooth.

From rich and creamy cheesecakes to nutty energy bites and fruit-filled parfaits, these no-bake dessert recipes prove that you don’t need flour to create a show-stopping dessert.
Each no-bake dessert in this roundup is carefully crafted with naturally gluten-free ingredients like oats, nuts, chocolate, and coconut, ensuring that everyone can enjoy these delights without compromising on taste or texture. With a mix of classic flavors like peanut butter and chocolate, alongside fresh twists like matcha and coconut, there’s something for every palate.
Whether you’re hosting a party, needing a quick weeknight treat, or just want to cool off on a hot day, these no-bake dessert recipes will hit the spot.
Dive into this versatile list of gluten-free no-bake desserts and discover how easy (and delicious!) it can be to enjoy a sweet treat without gluten or an oven.
Other recipes you will like to try:
15 Best BEST HALLOWEEN JELLO SHOTS for kids
Benefits of Gluten-Free No-Bake Desserts
Gluten-free no-bake desserts offer a range of benefits that go beyond just being easy to make. Here are some key advantages:
- Quick and Convenient: With no need to preheat the oven or wait for baking time, these desserts can be whipped up in a fraction of the time, perfect for last-minute treats or busy schedules.
- Naturally Gluten-Free: Many no-bake desserts use ingredients like oats, nuts, fruits, and chocolate that are naturally gluten-free, making them a great option for those with gluten sensitivities or celiac disease without sacrificing flavor or texture.
- Great for Hot Weather: No-bake desserts are ideal for warm days when turning on the oven is the last thing you want. They help keep your kitchen cool while still allowing you to indulge in a sweet treat.
- Healthier Ingredient Choices: Many no-bake recipes rely on whole foods like nuts, seeds, and fruits, which are nutrient-dense and can offer a healthier alternative to traditional baked goods. This makes them a great option for those looking to enjoy dessert without refined flours or sugars.
- Kid-Friendly: Since no baking is involved, gluten-free no-bake desserts are often easier for kids to help make, fostering creativity and family fun in the kitchen.
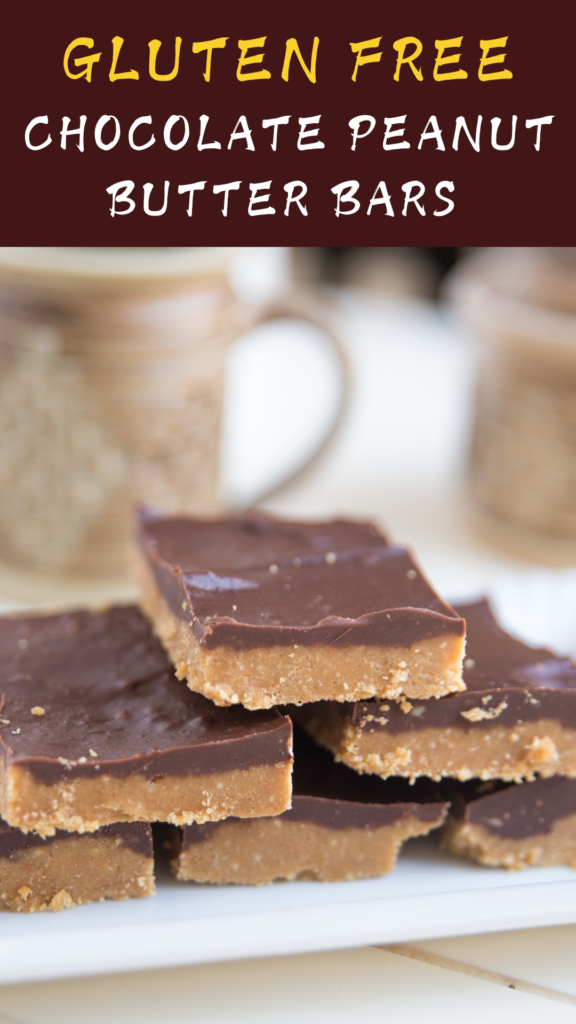
1. Gluten-Free Chocolate Peanut Butter Bars
Let’s make gluten-free lunch lady peanut butter bars!
These easy no-bake gluten-free no-bake desserts peanut butter bars are topped with a layer of chocolate for a delicious finish that’s perfect for peanut butter lovers!
Ingredients
For The Peanut Butter Bars:
- 1 1/2 cups (180 grams) gluten-free graham cracker crumbs
- 1 1/2 cups (180 grams) powdered sugar
- 1/4 teaspoon kosher salt (use 1/8 teaspoon or less if using fine table salt)
- 1 cup (248 grams) smooth peanut butter* (crunchy peanut butter will impact the texture)
- 1/2 cup (8 Tablespoons/113 grams) butter
For The Chocolate Topping:
- 1 cup (170 grams) semi-sweet chocolate chips
- 2 Tablespoons (30 grams) creamy peanut butter
Instructions
First, Make The Bars:
- Prep Your Pan. Grease an 8×8 or 9×9 metal baking pan or line with parchment paper (my preference).
- Crush The Graham Crackers. If you haven’t already, crush the graham crackers into fine crumbs in a food processor or a zip-top bag with a rolling pin. (You don’t want any large pieces for these bars.)
- Assemble Bar Ingredients. Add the graham cracker crumbs to a large bowl, along with powdered sugar, and salt. Add the peanut butter.
- Melt The Butter. Next, melt the butter in a microwave-safe bowl in 15-20 second increments until it’s fully melted. (You can also do this on the stove in a saucepan over medium heat) Pour the melted butter over the graham cracker crumbs, sugar, salt, and peanut butter. Stir to combine until the mixture is smooth and uniform.
- Pat It Out. Transfer the peanut butter mixture to your prepared pan and gently spread it into an even layer or pat the mixture out with your hands. (Using a little bit of parchment paper can make this easier!)
Then Make The Chocolate Topping:
- Melt Peanut Butter & Chocolate Chips. Add 2 Tablespoons peanut butter and the chocolate chips to a microwave-safe bowl and gently melt in 20-30 second intervals until the mixture is smooth.
- Pour & Spread. Next, pour the melted chocolate mixture over the peanut butter filling and smooth into an even layer.
- Chill the bars until set, about 2 hours or so.
- Serve & Store. Cut into squares or bars with a sharp knife and enjoy immediately. Store leftovers in an airtight container in the fridge up to 1 week. (You can also freeze them up to 2 months)
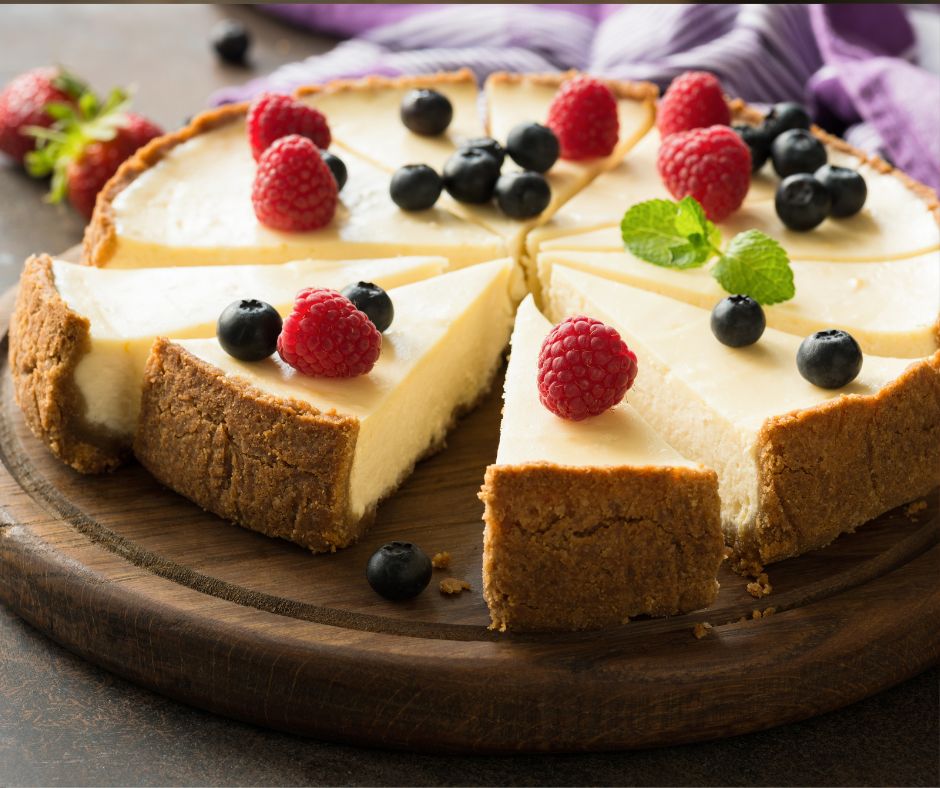
2. Easy No Bake Cheesecake Recipe
This easy no bake cheesecake recipe is truly outstanding. It’s a delicious blank canvas for any toppings you desire. It’s simple to make and requires only a few ingredients. Make it with a gluten-free or regular crust!
Ingredients
- 1 9- inch gluten free graham cracker crust
- 2 8- oz packages cream cheese room temperature
- 3/4 cup powdered sugar
- pinch of fine sea salt
- 2 teaspoons fresh lemon juice
- 2 teaspoons pure vanilla extract
- 2 cups heavy whipping cream
Instructions
- Make the graham cracker crust and press it into a 9-inch springform pan or use a store-bought gluten free graham cracker crust.
- In a large bowl, beat the cream cheese until smooth. Scrape the bowl and add the powdered sugar, pinch of salt, lemon juice, and vanilla extract. Beat until smooth and creamy.
- While the mixer is running on low speed, slowly pour in the whipping cream. Continue to beat on low until all the cream is added. Then slowly increase the speed of the mixer and beat until the mixture is thick and creamy.
- Transfer the cheesecake batter to the prepared graham cracker crust. Refrigerate at least 6 hours but preferably overnight. Keep refrigerated until ready to serve.
3. No-Bake Coconut Macaroon
For the coconut lover, I’ve got the perfect recipe for you. They’re called No-Bake Coconut Macaroons, and they’ll give you a delicious coconut fix while keeping you in ketosis!
Ingredients
- 2 ½ cups shredded coconut
- ¼ cup monk fruit sweetener
- ¼ cup coconut cream
- ¼ tsp vanilla extract
Instructions
- In a food processor add all ingredients, and pulse until combined about 2 min
- Scoop cookies onto a plate or lined cookie sheet.
- Refrigerate for 15 min and enjoy.
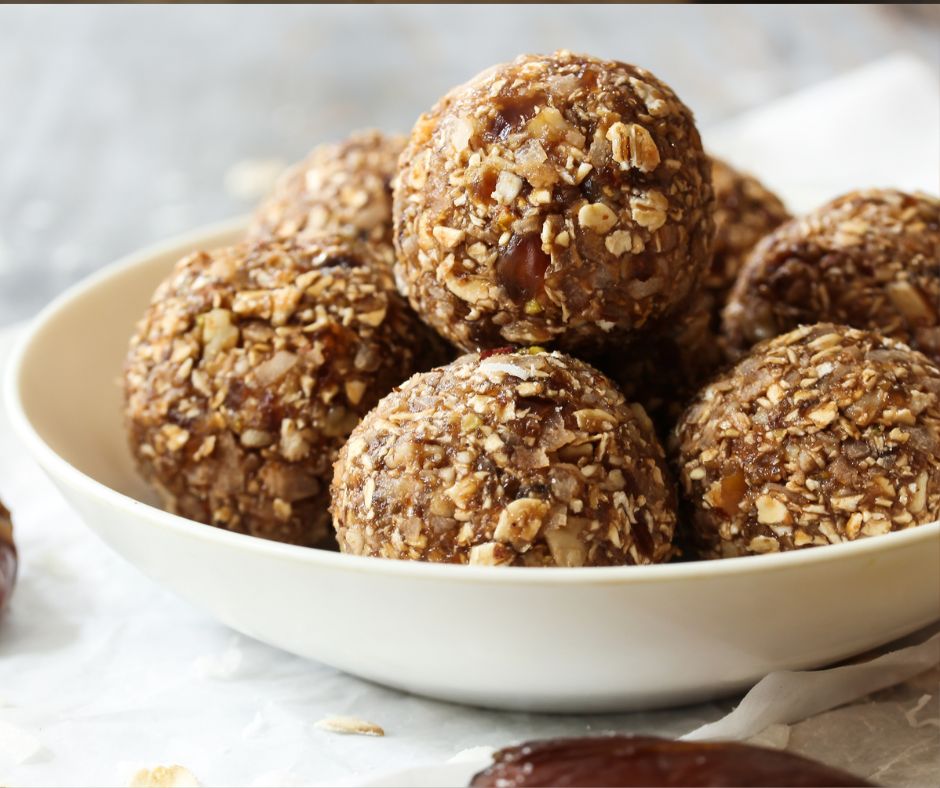
4. No-Bake Protein Balls
Super easy and mouth-watering no-bake protein balls! Not only are they bursting with delicious flavor, they only take 10 minutes to make and are packed with protein, oats, and nut butter to ensure a healthy protein breakfast or snack.
Ingredients
- 1 cup quick cook oats certified gluten-free
- 1 cup vanilla protein powder
- ½ cup peanut butter or almond butter
- ⅓ cup maple syrup or honey
- 1 tablespoon chia seeds
- ¼ teaspoon cinnamon
- pink Himalayan salt pinch of
- 1 tablespoon water plus more if needed which depends on the type of protein powder used (see notes below)
- ½ cup dairy-free mini chocolate chips
Instructions
1- Line a large baking pan with parchment paper.
2- In a large bowl combine the oats, protein powder, peanut butter, maple syrup, chia seeds, vanilla extract, cinnamon, and a pinch of salt and mix well. Add 1 tablespoon at a time of water (up to about 3-4 tablespoons total – see notes below) until the consistency is like a dough and all the oats are coated. Mix in the chocolate chips.
3- Using a tablespoon cookie scoop, scoop out the dough onto the cookie sheet. Using your hands, roll each ball of the dough into smooth balls and set each back on the parchment paper. Store in the refrigerator in an airtight container for up to 1 week.
5. No Bake Caramel Brownies Recipe (Gluten-free, Vegan)
For all the caramel lovers out there, these no-bake desserts caramel brownies are everything you’ve been dreaming of! Made with just a handful of healthy ingredients, they combine the rich, chocolatey flavor of a fudgy brownie with the irresistible sweetness of gooey salted caramel.
Ingredients
Brownies:
- 1 ½ c pitted medjool dates
- 1 c walnuts
- ½ c hazelnuts
- ⅓ c cocoa powder
Salted Caramel:
- ½ c almond butter
- ¼ c maple syrup
- 1 tablespoon almond milk
- 1 tablespoon coconut oil
- ¼ teaspoon sea salt
Instructions
Brownie:
- Combine all ingredients in a food processor until it reaches a brownie consistency. Press down into lined loaf pan.
Salted Caramel:
- Stir together all ingredients until smooth and pour over top of brownie layer. Place in the freezer to firm (about 1hr.)
- Once set, sprinkle with flaky sea salt, slice into 10-12 squares and enjoy! Best stored in the freezer.
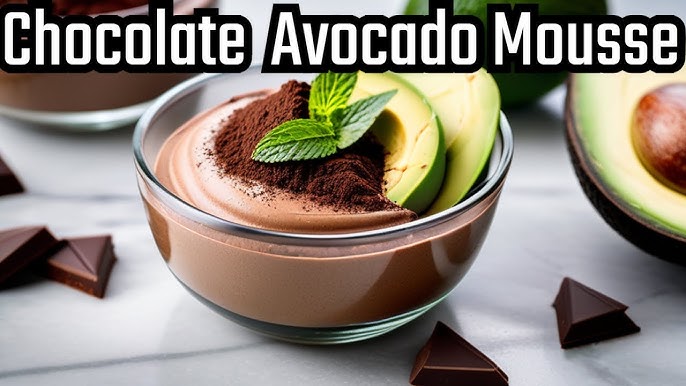
6. Healthy, No-Bake Chocolate Avocado Mousse
Rich & creamy, Chocolate Mousse, made from creamy Avocados, Cacao powder & Medjool Dates. This healthy no-bake desserts RECIPE not only tastes amazing, but is good for you! Vegan, Gluten Free & Paleo. Allergy-friendly.
Ingredients
- 2 large avocados, halved, pit removed
- 1/4 C. Medjool dates, pitted and soaked in warm water 10 minutes
- 1/2 C. raw cacao powder
- 1/4 C. coconut milk (or other non-dairy milk)
- 1 tsp. pure vanilla extract
- pinch Sea Salt
- cacao nibs (for garnish)
Instructions
- Combine all ingredients in a food processor except for cacao nibs.
- Process until smooth, adding additional milk if needed.
- Pipe into serving dishes for a fancier presentation.
- Chill in the refrigerator until ready to serve.
- Sprinkle with cacao nibs.
- Garnish with fresh berries or coconut flakes if desired.
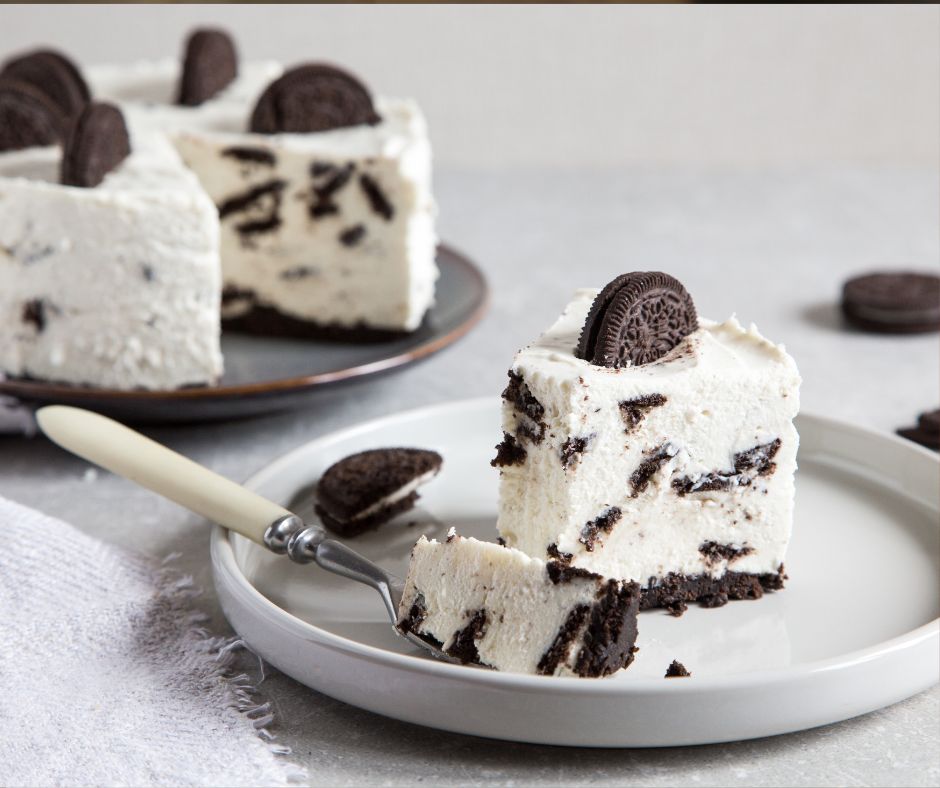
7. Gluten Free Oreo Cheesecake (No Bake!)
Not only is this Gluten Free Oreo Cheesecake incredibly delicious, it’s also no bake so we can make it even when it’s 1000 degrees outside!
Ingredients
Crust
- 14.3 ounces (405g or 1 pkg plus 4 cookies from another pkg) gluten free Oreos
- ½ cup (113g) butter, melted
Filling
- ⅔ cup (160g) heavy whipping cream, cold
- 4 8-oz blocks (904g) cream cheese, softened
- ½ cup (100g) granulated sugar
- ¼ cup (76g) sweetened condensed milk
- ⅓ cup (80g) sour cream, at room temperature
- 1 tablespoon vanilla extract
- pinch of salt
- 9.86 oz (279g or the rest of the 2nd pkg) gluten free Oreos
Instructions
Make the Crust
- In the bowl of a food processor, add one entire package of gluten free Oreos (12.8 ounces) plus 4 cookies from a 2nd package (save the rest of the 2nd package for the filling). Pulse into fine crumbs.
- Turn the processor on to low and slowly pour in the melted butter. Continue processing for another 20-30 seconds, or until the mixture turns into wet sand.
- Dump crumb mixture into springform pan and press on the bottom and up the sides of the pan. I use the bottom and sides of a drinking glass.
- Place in refrigerator for 30 minutes while you make the filling.
Make the Filling
- Dump the remaining package of Oreo cookies into a large (gallon-size) ziptop bag and use the end of a rolling pin to crush them into irregular-sized pieces. Set aside.
- Using the whisk attachment, whip heavy cream until stiff peaks form. Transfer to a small bowl and refrigerate until ready to use.
- Using the same bowl and whisk attachment, whisk the cream cheese until smooth. Slowly stream in the sugar and whisk until fully incorporated. Stop the mixer to scrape down the sides and bottom of the bowl.
- Add the sweetened condensed milk, sour cream, and vanilla and beat well. Stir in the crushed Oreo cookies, then gently fold in the whipped cream.
- Pour into prepared crust and smooth the top with an offset spatula. Refrigerate for at least 6 hours, up to 3 days.
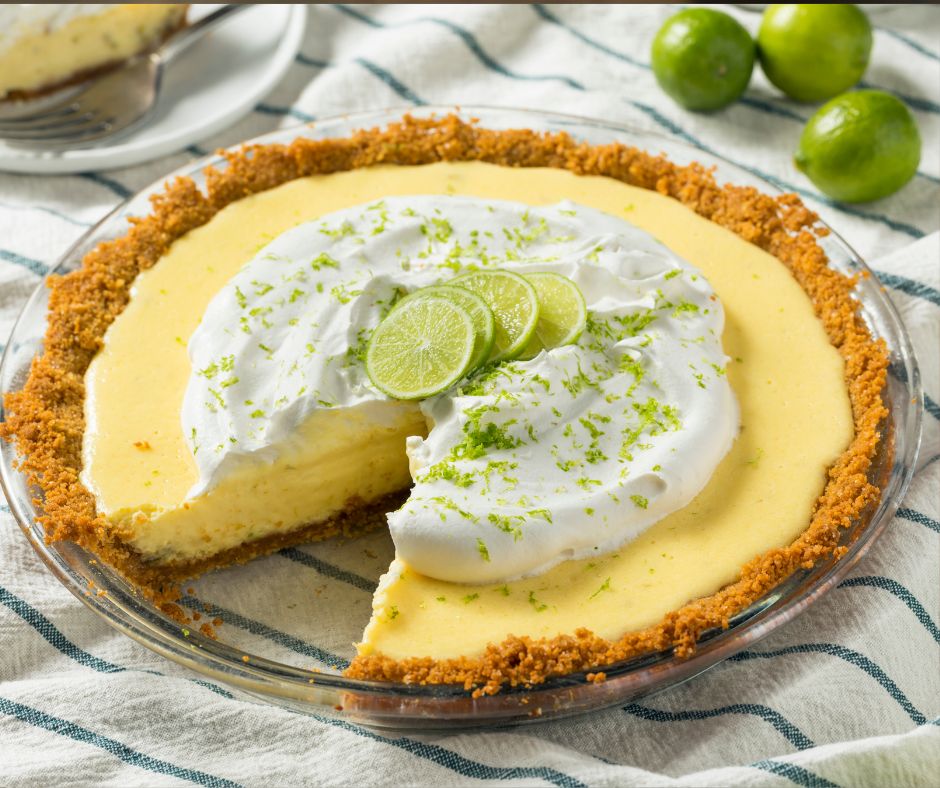
8. Easy Gluten Free Key Lime Pie (Vegan & No-Bake)
This easy, creamy, and delicious key lime pie is vegan, gluten-free, and requires no baking. The healthier version has all of the same flavors without all of the sugar and calories!
Ingredients
Crust
- ½ cup dates pitted
- 1 cup almonds
- ½ cup shredded coconut
Filling
- 4 tbsp lime juice fresh
- 1 cup coconut milk canned (mostly solids)
- 2 tsp liquid stevia or 1/3 cup powdered sugar
- 2 tsp vanilla extract
- 3 tbsp coconut oil melted
- 2 cups raw cashews soaked overnight
Instructions
- First soak cashews overnight and soak pitted dates if they are not moist and stick for 30 minutes in warm water.1/2 cup dates,2 cups raw cashews
Crust
- Place almonds in a blender or food processor and pulse until a ground consistency. Then add dates (drained) and shredded coconut. Continue pulsing until the crust is grainy but sticky.1/2 cup dates,1/2 cup shredded coconut,1 cup almonds
- Line an 8’’ square pan with parchment paper and transfer the crust mixture into the pan. Then press it down to cover the bottom of the pan evenly.
Filling
- To make the filling, place the soaked and drained cashews, lime juice, liquid stevia, vanilla extract, coconut oil, and canned coconut milk in a food processor or blender. Pulse on high until completely smooth.4 tbsp lime juice,1 cup coconut milk,2 tsp liquid stevia,2 tsp vanilla extract,3 tbsp coconut oil,2 cups raw cashews
- Pour the filling over the crust and spread it evenly with a spatula. Then, refrigerate the pie for at least 3 hours or until completely set. This process can be sped up by placing the dessert in the freezer for one hour and then moving it to the fridge to set.
Slice & Garnish
- Finally, once set, remove the pie from the pan by lifting up the parchment paper. Then cut into 9 square slices. Garnish with slices of key lime, berries, edible flowers, shredded coconut or crushed nuts.
9. Gluten-free Vegan Oreo Truffles (Paleo option)
First, they are SO easy! No baking involved. Simply mix in a food processor, roll and dip. Even my friends who don’t like to bake find these approachable!
Ingredients
- 30 gluten-free, dairy-free chocolate sandwich cookies *see notes
- 4 oz dairy-free cream cheese we love Violife or Kitehill
- 1 10oz package dairy-free chocolate or white chocolate chips
- 1/2 teaspoon mint or peppermint extract optional
Instructions
- Pulse cookies in a food processor until just crumbs. Add cream cheese, cut into smaller cubes, and extract (if using) in the food processor. Pulse until mixture is combined and forms a large ball. Mixture should not be crumbly and hold together, but not be too sticky to form into balls. See notes if not the case.
- Form small balls of cookie mixture (*a great part to let kids help with!) and place them on a tray sprayed with cooking spray to prevent sticking. Freeze until hard, 30 min-hour.
- Remove from freezer. Melt chocolate chips in the microwave or on the stove. Dip each frozen cookie ball in the melted chocolate and place back on tray. We make this process easier by stabbing each frozen ball with a toothpick for dipping, then removing once placed on tray and covering up the hole with a small dab of melted chocolate.
- Repeat with all frozen cookie balls. Top with decorative chocolate, nuts, or melted chocolate squiggles. Store in the freezer or fridge.
10. No-Bake Cheerios Peanut Butter Bars Recipe (Allergy and Gluten Free!)
These no-bake desserts Cheerios Peanut Butter Bars are super healthy, filling and allergy as well as gluten-free!
Ingredients
- 3 cups regular Cheerios
- 1/2 cup peanut butter (to keep it allergy-free, we used soy nut butter)
- 1/2 cup raw honey
- 1/2 cup raw oats
- 1/2 cup chocolate chips
Instructions
- In a microwaveable bowl, combine the honey and soy nut butter.
- Microwave for about 30 second and stir until it is creamy.
- Add in the oats, chocolate chips and Cheerios.
- Using a paper towel, swipe the inside of an 8×8 baking pan with Crisco to keep the mixture from sticking.
- Press the mixture into the dish. Refrigerate for an hour then cut into squares.
11. No Bake Paleo Nut Butter Cups
These No Bake Paleo Nut Butter Cups are made with a combination of dark chocolate, tahini, and almond butter to create that irresistible Reese peanut butter cup taste. This easy to make treat is a healthier option that will still satisfy your sweet tooth. It also happens to be gluten free, grain free, dairy free, and refined sugar free.
Ingredients
- 1/2 cup tahini (*see note below)
- 1/4 cup almond butter (*see note below)
- 1 teaspoon vanilla extract
- 4 Tablespoon coconut sugar
- 1 Tablespoon tapioca starch
- 1 Tablespoon honey
- 1 (9 oz) bag Hu Gems
- Salt (to top the nut butter cups with)
Instructions
- Start by placing 12 muffin liners in each tin of the muffin pan (see note below). Put half of the bag of the Hu dark chocolate gems (about 3/4 cup) in a microwavable safe bowl and heat in the microwave in 30 second increments until melted. It will take approximately 2 minutes to fully melt but make sure to stir the chocolate after each 30 seconds to avoid burning it. Pour the chocolate into the muffin tins so that the chocolate is evenly distributed throughout all 12 cups. Take a spoon and smooth out the chocolate so that the bottom of the muffin tin is evenly covered. Place the muffin pan in the refrigerator while you make the filling.
- To make the filling, mix together the tahini, almond butter, vanilla extract, coconut sugar, tapioca starch, and honey using a hand mixer. To get a smoother consistency, sift the coconut sugar before mixing it with the other ingredients. If using raw honey, melt it in the microwave before adding it to the remaining ingredients. Remove the muffin pan from the refrigerator and add about 1 tablespoon of filling on top of the chocolate. Use a spoon to spread the filling evenly on top of the chocolate making sure the top is flat. Place in the muffin pan back in the refrigerator.
- Heat the remaining dark chocolate gems (about 3/4 cup) in 30 second increments until it is melted. It will take about 2 minutes to fully melt but make sure to stir the chocolate after each 30 seconds to avoid burning it. Remove the muffin pan from the refrigerator and pour the chocolate on top of the nut butter filling. Use a spoon to spread the chocolate evenly so that the top of the nut butter filling is covered completely. Sprinkle salt on top of each cup and place the muffin pan in the refrigerator for at least 5 minutes or until the chocolate is hardened.
12. No-Bake Vegan Strawberry Shortcake Bars
These incredibly creamy No-Bake Vegan Strawberry Shortcake Bars are made in the blender! They have a cashew base and taste just like a frozen strawberry shortcake. No baking is necessary to make these gluten-free and vegan dessert bars.
Ingredients
For the crust
- ¾ cup raw cashews
- ¼ cup almond flour
- 4 pitted Medjool dates
- 2 tablespoons coconut oil
- ¼ teaspoon kosher salt
For the cheesecake
- 2 cups raw cashews, soaked in cold filtered water for at least four hours or preferably overnight (see Notes
- ½ cup canned coconut milk, shaken
- ¼ cup coconut oil, melted and cooled, use refined coconut oil if you want no coconut flavor
- ⅓ cup pure maple syrup
- 2 tablespoons fresh lemon juice
- 1 tablespoon vanilla extract or 1 teaspoon vanilla bean powder
- 2 cups strawberries, halved
Instructions
- Line an 8×8” pan with parchment paper and grease well with coconut oil. Set aside.
- Add the cashews, almond flour, pitted dates, coconut oil and salt to a food processor or high-powered blender and pulverize until it comes together into a sort of sticky dough, with small bits remaining. Don’t over process, or it’ll turn into nut butter! Press the date dough evenly along the bottom of the prepared pan.
- In the same food processor or high-powered blender (no need to wash between – I used my Vitamix, but most powerful blenders should do the job), combine all of the filling ingredients except the strawberries and blend for about 2 minutes, or until the mixture is silky smooth and creamy. Scrape down the sides as necessary. You may need to add a bit more coconut milk or lemon juice to get it to blend smoothly if your blender isn’t super high-powered.
- Once it’s smooth, taste the mixture and adjust the sweetness/tartness levels, if desired.
- Pour the filling into the prepared pan over the crust. Smooth out the top and tap the pan hard against the counter a few times to release any air bubbles. Press the strawberry halves into the bars.
- Place in the freezer to firm up for at least 3 hours before cutting. I recommend running your knife under hot water to warm it up before cutting the bars with the still-hot (dried) knife. Let them thaw at room temperature for 10-15 minutes before serving.
- Store leftovers tightly wrapped in the freezer.
13. The Best Chocolate Gluten Free No Bake Cookies
These sweet no-bake gluten-free chocolate cookies come to the rescue when craving a sweet treat. You get yummy cookies without the hassle of firing up the oven on those hot summer days. These no-bake cookies will become your new favorite summer recipe.
Ingredients
- ▢1 cup peanut butter smooth or crunchy
- ▢⅓ cup honey
- ▢⅓ cup coconut oil
- ▢2 cups gluten free rolled oats use certified gluten free oats
- ▢½ cup almond flour
- ▢¾ cup shredded coconut unsweetened
- ▢¾ cup chocolate chips
Instructions
- In a medium-sized saucepan, add the peanut butter, honey, and coconut oil.
- Cook on low heat until melted. Stir frequently Add the chocolate chips.
- Stir until mixed. The chocolate chips will melt quickly.
- To make this in the microwave, add the chocolate, peanut butter, honey, and oil in a microwave-safe dish. Microwave 35 seconds, then stir. Repeat intervals of 20 seconds until the mixture is melted. Mix to combine.
- Add the oats and almond meal.
- Mix together.
- Drop into a mini muffin tin, or use a cookie scoop to drop cookie dough onto a wax paper-lined cookie sheet.
- Refrigerate the cookies for one hour until hardened.
- Refrigerate any extras in a container. You can also freeze the cookies in a zip-style bag.
14. No Bake Banana Cream Pie
You can make this pie several different ways as you’ll see below, but nothing beats homemade pie in the wilderness that’s for sure. I can barely wait for tonight when I’ll be sitting by a campfire, (my first of the season) and eating Banana Cream Pie.
Ingredients
Pie Crust:
- 2 cups raw cashew pieces, see notes
- 1 cup unsweetened shredded coconut
- pinch of sea salt
- 1 Tablespoon maple syrup
- 1 Teaspoon vanilla
Vanilla Pudding Layer:
- 1/3 cup pure maple syrup, I use Grade A amber
- 3 Tablespoons tapioca starch
- 1 can full fat coconut milk, I use Native Forest
- pinch of sea salt
- 1/2 vanilla bean, split lengthwise
Banana Layer:
- 3 ripe bananas, peeled and thinly sliced + 1 additional banana for garnishing the top
Coconut Whipped Cream:
- 2 cans refrigerated full fat coconut milk
- 1–2 Tablespoons maple syrup
- pinch of sea salt
- 2 Teaspoons vanilla extract
Instructions
- For the pie crust, add the cashews, coconut, and sea salt to a 12-cup food processor and process until the texture is fine. Add the maple syrup and vanilla, and process again until it starts to clump. If it looks a little dry, add a small amount of water, 1 Teaspoon or so until the dough comes together.
- Press the crust into a 9″ pie plate, or divide it evenly among individual serving dishes. Depending on the size of your serving dishes, this recipe will make between, 8-12 individual servings. Cover and refrigerate the crust(s) while you make the rest of the recipe.
- Next make the pudding by whisking together the maple syrup and tapioca starch in a medium sized saucepan. Then whisk in the coconut milk and sea salt, and add the vanilla bean. Cook the pudding over medium-high heat, whisking constantly until it comes to a boil. Once it boils immediately remove it from the heat, and leaving the vanilla bean in, place it into a container to refrigerate for 1-2 hours, or until barely warm.
- When the pudding has cooled to barely warm, it’s time to make the coconut whipped cream.
- Scoop the hardened coconut cream off the top of each can of coconut milk and place it into a bowl. Then add the maple syrup, sea salt, and vanilla before using a stand mixer or electric mixer to beat the coconut cream into fluffy peaks.
- Remove the vanilla bean from the pudding and using your fingers, strip out all the vanilla bean seeds into the pudding, mix to combine. Measure out 3/4 cup of coconut whipped cream and fold it into the cooled pudding.
- For the individual desserts, layer the thinly sliced bananas over the refrigerated crust, then top with the pudding, and finally the whipped cream. The individual desserts only need another 2-3 hours in the refrigerator to set up.
- For the regular 9″ pie, refrigerate it covered with just the bananas and pudding, and refrigerate the coconut whipped cream separately.
- Chill the banana cream pie again for another 6 hours or overnight. When you’re ready to serve the pie, top with the additional banana and pipe the remaining whipped cream around the edges. You won’t need the extra banana if you’re doing individual desserts.
- This pie keeps well refrigerated for up to 3 days.
15. No Bake Pumpkin Pie (Gluten Free & Dairy Free)
Skip the oven this holiday and make a No Bake Pumpkin Pie! This pumpkin pie has a graham crust and is gluten free and dairy free with a vegan option.
Ingredients
- 1 9-inch Mi-Del graham crust OR gingersnap crust (or your favorite pre-baked traditional pie crust)
- 1 cup canned coconut milk
- ½ cup brown sugar
- 2 Tablespoons arrowroot starch
- 2 teaspoons gelatin powder (or just slightly less of the same amount of agar powder for vegan*)
- 1 cup canned pumpkin puree
- 1 teaspoon pumpkin pie spice
- 2 teaspoons vanilla extract
- Dash salt
Instructions
- Put the canned coconut milk into a small saucepan and before turning on the heat, whisk in the brown sugar, arrowroot starch, and gelatin. Make sure that you add the arrowroot starch before adding heat and whisk it well, or it can create lumps.
- Turn on the heat to medium-low and heat the coconut milk mixture until it thickens, about 8-9 minutes, stirring frequently.
- Once thickened, turn off the heat and whisk in the canned pumpkin, pumpkin pie spice, vanilla, and dash of salt.
- Pour pie filling into your preferred pie crust. Chill in the fridge about 15-20 minutes before covering with a lid or plastic wrap (this prevents condensation on the top of the pie since the filling is a little warm).
- Allow the pie to chill and set for several hours. It is fully set and sliceable at 6 hours.
- Top with coconut whipped cream and enjoy! Keep this pie covered and stored in the fridge.
16. No Bake Raspberry Cheesecake Bars
No bake raspberry cheesecake bars are the perfect treat to make without an oven. The creamy raspberry swirl cheesecake and buttery graham cracker crust is delicious!
Ingredients
Graham Cracker Crust
- ▢9 (157 g) graham cracker sheets
- ▢¼ cup (32 g) confectioners’ sugar
- ▢½ cup (113 g or 1 stick) unsalted butter, , room temperature
- ▢½ teaspoon kosher salt
Raspberry Purée
- ▢½ cup (60 g) fresh raspberries
- ▢2 tablespoons granulated sugar
Cheesecake Filling
- ▢16 ounces (170 g) cream cheese, , room temperature
- ▢1 cup (125 g) confectioners’ sugar
- ▢2 tablespoons fresh lemon juice
- ▢1 tablespoon lemon zest
- ▢½ teaspoon vanilla extract
- ▢½ teaspoon kosher salt
Instructions
Graham Cracker Crust
- Line an 8×8 baking pan with parchment paper and set aside. In a plastic bag, crush the graham crackers finely with the bottom of a measuring cup. In a large bowl, combine graham crackers, 1/4 cup confectioners’ sugar, salt, and melted butter. Stir the mixture the mixture is the texture resembles wet sand. Dump the graham cracker mixture into the prepared pan. Press the mixture down with your hands to create an even layer. Freeze for 10 minutes.
Raspberry Purée
- Place raspberries in the bowl of a food processor and sprinkle sugar on top. Let the berries sit for 15 minutes so the raspberries get juicy. Pulse the berries until smooth, about ten 1-second pulses. Press through a fine mesh strainer, discarding any seeds and pulp that remain. Stir in the sugar. Set aside and make the cheesecake mixture.
Cheesecake Filling
- In a separate bowl, combine cream cheese, confectioner’s sugar, lemon juice, lemon zest and vanilla, stirring until smooth. Spread the cream cheese mixture evenly on top of the graham cracker crust.
- Dollop spoonfuls of the raspberry purée on top of the unbaked cheesecake. Use a skewer or knife to make swirls.
- Freeze cheesecake bars uncovered for one hour. Transfer the frozen cheesecake onto a cutting board, peeling away the parchment paper. With a sharp knife, cut into bars. Store in an airtight container in the fridge (or freezer) and serve cold.
17. Healthy No Bake Almond Joy Bars
These No Bake Almond Joy Bars are a delicious dessert filled with coconut and almond butter then topped with chocolate for the ultimate bite. An easy vegan bars recipe that is sure to satisfy your sweet tooth!
Ingredients
- 1 cup shredded coconut (unsweetened)
- 1/3 cup almond meal (almond flour)
- 1/4 cup coconut oil
- 1/3 cup almond butter
- 1/4 cup honey (or maple syrup if you want vegan)
- 1/4 cup raw sliced almonds
- 1/4 teaspoon ground cinnamon
- 1/2 teaspoon vanilla extract
Chocolate Drizzle:
- 1/2 cup dark chocolate chips
- 1 tablespoon coconut oil
Instructions
- Spray a loaf pan with coconut oil, set aside.
- Add coconut oil and almond butter to a medium bowl. Put in the microwave and melt. (about 30 seconds – 1 minute). Stir together until smooth.
- Add honey and vanilla, continue to stir until combined.
- Using a spatula, mix in shredded coconut, almond meal (almond flour) and sliced almonds. Mix until combined and the mixture forms a ball.
- Pour mixture into prepared loaf pan. Spread out evenly. Set aside.
- For the chocolate drizzle. To a small bowl add dark chocolate chips and 1 tablespoon of coconut oil. Put in microwave and melt in 30 second increments. (should just take two times) Stir with a spoon so mixture is smooth and liquidy.
- Pour the chocolate drizzle over the coconut almond mixture. Spread evenly.
- Optional: top with chopped raw almonds or toasted coconut.
- Place in refrigerator until the topping is set. Serve.
18. Easy Coconut Matcha Energy Balls
These coconut matcha energy balls are such an easy, healthy make-ahead snack idea. Matcha provides an added boost of energy and nutrition benefits. Recipe is vegan, gluten-free, and no-bake!
Ingredients
- 2 cups medjool dates, pitted (roughly 17 dates, depending on size)
- 2 tsp matcha powder
- 1 cup dessicated coconut
- 3/4 cup almond flour
- 1/2 cup hemp seeds
- 2 tsp vanilla extract
- 1 tsp ground cinnamon
- 1/4 cup water
Instructions
- PREP: Line a baking sheet or plate with parchment paper. Set aside.Optional: place a few spoonfuls of desiccated coconut into a separate small bowl or dish. This is NOT the 1 cup of coconut that goes into the balls, but what the balls get rolled into so that they’re coated on the outside (if you’d like them to be)!
- Add all ingredients to a large food processor. Pulse until it forms a paste-like texture. If things aren’t sticking together, feel free to add a splash more water until it does.
- Using a large spoon, take a couple spoonfuls of the mixture from the food processor and place it in your hands. Roll into balls, then roll the balls in the dish with the coconut until the outsides of the balls are fully coated (extra coconut part optional!). Place finished ball onto the parchment lined baking sheet/plate. *this part is meant to be a little messy!
- Repeat until all mixture is used up. Recipe as written should make about 10-12 balls, depending on size.
- Place the plate/sheet of balls into the freezer for 2 hours to allow them to firm.
- Allow balls to thaw for a couple minutes before you enjoy them. The texture is meant to be soft and chewy. Store remaining in the fridge or freezer for later!
19. Vegan Chocolate Pie
This no-bake vegan chocolate pie recipe is rich, chocolatey and irresistibly creamy. A delicious pie that’s gluten and dairy free.
Ingredients
Chocolate Crust:
- ▢1 cup pecans
- ▢1 cup dates (pitted)
- ▢3 Tablespoons unsweetened cocoa powder
- ▢4 Tablespoons unsweetened coconut
- ▢2 Tablespoons honey (or maple syrup)
- ▢¼ teaspoon fine sea salt
Vegan Chocolate Pie Filling:
- ▢½ cup roasted cashews (soaked for at least one hour)
- ▢1 ¼ cups semisweet chocolate (melted)
- ▢12 ounces firm silken tofu (drained)
- ▢3 Tablespoons unsweetened cocoa powder
- ▢6 Tablespoons honey (or pure maple syrup)
- ▢2 teaspoons pure vanilla extract
- ▢2 Tablespoons almond milk
- ▢¼ teaspoon fine sea salt
Coconut Whipped Cream (optional):
- ▢14 ounces coconut cream
- ▢¼ cup powdered sugar
- ▢½ teaspoon pure vanilla extract
Instructions
- Place ½ cup of cashews in a glass bowl and pour boiling water over them until fully submerged. Let sit for one hour then drain.
Make the Crust
- Very lightly grease a 9 or 10” deep dish round pie plate. Set aside.
- Place pecans in the container of a food processor fitted with an “S” blade, or in a Vitamix blending container. Process/blend until pecans are crumbly (about 15 seconds) starting on low speed increasing to high.
- Add dates and process/blend for 15 seconds, starting on low speed increasing to high, until mixture is crumbly.
- Then, add the remaining ingredients and process/blend until the mixture turns a dark chocolatey brown and just sticks together. Stop blending before it gets too wet and sticky.
- Dump the mixture into the pie plate/baking dish and press into the shape of the pan.
- Refrigerate the crust while you make the filling.
Make the Filling
- Melt the chocolate (either on the stove or in the microwave), until smooth. Set aside.
- Put all the ingredients into the container of a high-powered blender and blend, starting on low speed and increasing to high, until the mixture is smooth.
- Pour mixture into prepared crust and store in the refrigerator until chilled and firm (at least 6 hours, preferably overnight).
Coconut Whipped Cream
- Chill coconut cream in the refrigerator overnight and do not shake it.
- Place the container & whisk attachment of your standing mixer in the refrigerator to chill for at least 10 minutes (or longer).
- Carefully opened the can of chilled whipped cream and transfer the top, thickened cream to the chilled mixing bowl. (save the liquid for a different use).
- Beat the cream with the wire whisk attachement for about 30 seconds.
- Add powdered sugar and vanilla and beat until creamy.
- Taste and adjust sweetness if necessary.
- Spread on top of pie immediately or store in an airtight container in the refrigerator and serve alongside the pie.
20. Vegan Chocolate Salted Caramel Tarts
These Vegan Chocolate Salted Caramel Tarts are dairy-free, gluten-free, refined sugar-free and can be made oil-free. They consist of a raw crust, made of nuts and dates, some homemade caramel sauce and a creamy chocolate layer.
Ingredients
Crust
- ½ cup (100g) buckwheat groats
- ½ cup (70g) almonds
- ½ cup (70g) cashews
- 6 (90g) Medjool dates or sub 1 cup “normal/small” dates (~20)
- 3 tablespoon maple syrup
- 1 tablespoon coconut oil, melted *optional
Caramel Filling
- ¼ cup (60g) smooth peanut butter 100% peanuts
- ¼ cup (70ml) maple syrup
- tiny pinch of salt
Chocolate Ganache
- ¾ cup (160g) coconut cream *see notes
- 100g (3.5oz) vegan dark chocolate
Instructions
Crust
- Add buckwheat groats to your food processor and blend until coarsley ground.
- Then add almonds, cashews, dates and blend again until a crumbly mass forms (this might take a couple of minutes, until nuts have released their natural oils). Scrape down the sides every 30 seconds.
- Add maple syrup (& coconut oil) and blend again.
- Line six tartlet tins with parchment paper (or grease with a little bit of oil) and press the crust into the tin using your fingers (or a spoon).
Caramel Layer
- In a small bowl, mix together peanut butter, maple syrup & salt with a whisk. Stir until a smooth sauce forms.
- Spoon about 1,5 tablespoon of caramel into each of the tins.
Chocolate Ganache
- Heat a saucepan over low heat and add dark chocolate and coconut cream, while constantly stirring with a whisk.
- Once fully dissolved pour your chocolate cream mix over the caramel layer and place it in the fridge to set (about 4hours or overnight).