Have you ever questioned the magical ability of your Traeger grill to cook your food to absolute perfection? How do you know when your food is done? That’s where the Traeger Meat Probe comes in handy.
The Traeger probe is a form of temperature sensor that accurately measures the internal temperature of the food on your Traeger grill. From thick ribs to tenderloins, the probe ensures your meal reaches the desired level of doneness, hence, eliminating the worries of undercooked or overcooked food.
When using a Traeger grill or smoker, Traeger probe calibration is a crucial step in assuring accurate temperature readings.
Calibrating the probe regularly can help to ensure that your food is cooked to the desired temperature and can improve the overall grilling and smoking experience.
If you’re looking for a way “how to use Traeger probe”, then look no further.
Here are some of the best tips and tricks for getting the most out of your Traeger probe.
The Importance of the Traeger Probe
Using Traeger Probe is a game-changer and offers unmatched precision and convenience. Grilling to perfection is far more than just time and temperature.
It’s about understanding the internal temperature of what you are cooking, and that’s where the importance of the Traeger Probe comes in.
With the Traeger Probe, you can bid farewell to the guesswork and it allows you to maintain accurate temperature control throughout the cooking process.
Understanding the Function of the Probe
Traeger Meat Probe
A Traeger meat probe, also known as a ‘Traeger temperature probe’, or Traeger meat thermometer is a thermometer-type device that has a pointy sharp metal stem for insertion into meat to get the internal temperatures.
It is used to test whether foods have reached a certain temperature.
This thermometer-type device is inserted into the meat so that it can get the internal temperature.
It is used to track when the meat has reached a certain temperature so that it can be pulled off of the grill.
Unlike regular meat thermometers that require you to open the grill lid and lose precious heat and smoke to take a reading, the Traeger Probe stays inserted into the meat throughout the cooking process.
This provides you with real-time temperature readings without requiring you to interrupt the cooking process.
This device has many advantages like being able to see how long the cooking process is taking, knowing when it’s time to pull it off of the grill, and not having to use a knife to try to pierce through the meat.
Related >> 7 Treager Thermostat Problesms
The Intelli-Probe Technology
The Traeger Probe’s precision lies in its Intelli-Probe technology. This technology enables the probe to take accurate readings in both hot and cold temperatures.
Intelli-Probe technology typically comes with two temperature probes. These probes are inserted into the food you’re grilling or smoking, allowing you to monitor the internal temperature of multiple items simultaneously.
Traeger probe then sends signals to the digital controller or Traeger app on your mobile device via Wi-Fi. Once the internal temperature of your meat reaches the desired level, the grill will automatically reduce its heat to a ‘Keep Warm’ setting, preventing overcooking and keeping your food at the perfect temperature until you’re ready to serve it.
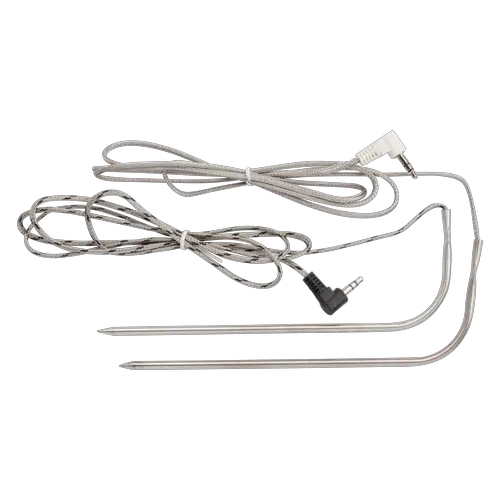
Getting Familiar with the Probe Components
The Probe Tip
The probe tip is the point at which the temperature of your cooking food is read. It’s sharp, thin, and designed to penetrate meat easily. When inserting the probe, make sure to place the tip in the thickest part of your food without touching any bone as it can misread the temperature.
The Stainless-Steel Cable
Attached to the probe tip is a flexible, stainless-steel cable. This allows you to close your grill lid securely without damaging the probe. The length of the cable is designed purposefully to ensure that the digital probe base remains outside of the grill, keeping it safe from heat damage.
The Digital Probe Base
The digital probe base translates the temperature reading from the probe tip into a digital reading you can monitor on your Traeger’s control panel.
This is the element you plug into your grill.
There is a rubber sleeve that is often ignored. The sleeve’s primary purpose is to protect the joint where the probe cable and the probe tip meet, which is a vulnerable point that can easily be compromised by heat, moisture, or mechanical damage.
How to Use Traeger Probe?
When cooking a thick cut of meat, it’s important to get the most accurate reading on the temperature.
First, ensure that the Traeger meat thermometer is drilled deep into the meat to get the most accurate reading.
When doing this, the trick is to calibrate Traeger probe into the thick part of the meat without touching the bone or getting it through the other end.
The trick is to make sure the probe doesn’t touch the bone, so be careful not to accidentally poke it through the other side so that it does not get into contact with the grill.
The Traeger grill thermometers come in a set that includes two, easy-to-use devices.
(a) A grill thermometer that measures the internal temperature of the grill. The easiest way to set this up is to attach the gas grill thermometer to one of the bars on the grill.
(b) The probe thermometer that constantly monitors the internal temperature of the meat
To use the Traeger cooking thermometer on a grill, set up it on the meat and then place another one into your grill.
You can let the meat cook while you relax and stay close to the monitor that gives you reading even up to 300 meters away.
Ideally, you want the probe to reach all the way to the center of the meat you are cooking. The thermometer should be inserted at least one inch deep.
Here are the stepwise Traeger meat probe instructions.
- Plug the probe into the grill on the Traeger controller at 3.5 mm.”
- Put the probe at the thickest part of the meat, making sure to avoid fat or bones. The thickness of the meat will change the insertion spot for the probe.
- Set the temperature reading to the desired level on the front display of the grill and keep monitoring. We can also do monitoring using the Traeger Wi-Fi App. The app also lets you monitor the grill’s temperature, and internal meat temperature, and control some settings while you’re away.
- When the grill reaches the desired temperature, place the meats on it and close it.
- Monitor the internal temperature of the meat at intervals of approximately 30 minutes or until the notification beeps. The app or the grill will beep to notify you when the meat has reached the set temperature.
- Remove the meat from the grill when it reaches the desired cooking temperature.
- Let the meat cool for a little before cutting it.
How to Calibrate Traeger probe?
Traeger MeatProbe Calibration Instructions

Here are the general steps for calibrating a Traeger probe:
Materials Needed:
- Traeger grill with a probe port
- Traeger probe
- Ice water
- A cup or bowl
- A reliable food thermometer (optional, for verification)
Traeger Probe Calibration Steps:
1. Prepare Ice Water:
- Fill a cup or bowl with ice cubes.
- Add just enough water to cover the ice.
2. Insert Traeger Probe:
- Insert the Traeger probe into the ice water, ensuring that the sensor (the tip of the probe) is fully submerged in the ice water.
3. Set Your Traeger Grill:
- Turn on your Traeger grill and let it reach its lowest temperature setting (usually around 150°F or 65°C).
4. Connect Probe:
- Plug the other end of the probe into the designated probe port on your Traeger grill.
5. Wait for Stabilization:
- Allow a few minutes for the Traeger probe’s temperature reading to stabilize. The reading should gradually settle to near the freezing point, which is around 32°F (0°C).
6. Calibration Adjustment:
- Access the temperature calibration settings on your Traeger grill’s control panel or through the Traeger app, if applicable.
- Adjust the temperature setting up or down as needed until the Traeger probe reads as close to 32°F (0°C) as possible.
7. Verification (Optional):
- For added confidence in the calibration, you can use a reliable food thermometer to double-check the probe’s accuracy. Insert the food thermometer into the ice water and compare its reading to the Traeger probe’s reading. They should be very close.
8. Finalization:
- Once you are satisfied with the calibration, remove the probe from the ice water, dry it thoroughly, and store it properly.
This calibration process may vary slightly depending on the model of your Traeger grill and the type of controller it uses.
You can always refer to your grill’s manual for detailed instructions on probe calibration, as some newer models may offer different calibration methods or even automatic calibration features through the Traeger app.
Also, check Which Traeger Grills have WiFi/WiFIRE
Can’t Get My Traeger To Connect To WiFi/WiFIRE (9-Steps)
How Far to Insert Traeger Meat Probe?
To get the best results, insert your probe as deep into the meat as you can while staying clear of fat and bone.
Both fat and bone tend to be hotter than the surrounding protein.
It’s often hard to insert the whole probe. Try getting at least 2 inches into your protein.
What are the best meats to cook with a Traeger Meat Probe?
Traeger Meat Probe has been created to meet all of your meat cooking needs.
However, you’ll need to take into account the thickness and preferably re-adjust the temperature accordingly.
Chicken, beef, and all other meats are different because they have different thicknesses, but we can cook them all with the Meat Probe just in case you’re wondering.
For instance, the uniformity in size and shape of chicken breasts makes them a good choice for the Traeger Meat Probe for accurate readings.
Tenderloin is also a good choice as it has leaner meat cuts, hence lower chances of getting overcooked. Steak can also be perfect for the Traeger Meat Probe as it can have varying degrees of cooking, with lots of flavors.
Avoiding Common Probe Mistakes And Problems
1- Inaccurate Readings
Calibration is key. Follow the calibration instructions provided in your Traeger manual or our previous instructions to ensure accurate temperature readings.
2- Damaged or Broken Traeger Probe
If your probe is visibly damaged or not functioning correctly, it may need replacement. Contact Traeger customer support or visit the Traeger website to order a new probe compatible with your grill model.
3- Connectivity Issues
If your probe is not connecting to your grill or app, make sure it’s securely plugged into the probe port. Check for any debris or damage around the probe port and clean it if necessary. Also, make sure that your grill’s firmware and app are up-to-date.
4- Probe Won’t Stay in Place
If the probe isn’t staying securely in the meat, you can use a probe clip or holder to keep it in position. These accessories are widely available and help prevent the probe from slipping out.
5- Probe Cables Are Too Short
Sometimes, the probe cable may be too short, limiting your placement options. You can purchase a probe extension cable to give you more flexibility in positioning the probe within your grill.
6- Temperature Fluctuations
If you notice temperature readings jumping around, it could be due to interference or loose connections. Just make sure that the probe is properly inserted, and the cable is secured. Avoid placing the probe near hot surfaces or flames, as this can affect its accuracy.
Here are a few other common reasons for Traeger temperature fluctuation
7- Error Codes (Er2)
If your Traeger grill displays an error code like “Er2” errors. These are often related to issues with the temperature probe.
Ensure that the temperature probe is securely connected to the grill and properly inserted into the meat you’re cooking.
8- Probe Wear and Tear
Over time, probes can wear out due to exposure to heat and moisture. It’s a good practice to inspect your probe regularly for signs of wear, such as fraying cables or damaged connectors.
If you notice significant wear, consider replacing the probe.
How to Troubleshoot a Traeger Temperature Probe
These are some tips that you can use to troubleshoot the Traeger temp probe calibration.
1- Check if the meat probe tip is broken. A broken tip can be replaced with a new one. Otherwise, contact the Traeger customer care desk for them to instruct you better in case you are missing out on something.
2- Inspect the condition of the 3.5 mm jack. This is part of the Traeger Meat Probe which inserts into the grill controller.
When it breaks in the controller, the pieces need to be removed from where it lodges. A jack removal tool can help in this process. After removing the broken jack and it does not resume normal functioning, consider purchasing a new meat probe as a replacement.
3- Examine if there is an electrical discharge before connecting the grill to the meat probe. An electrical discharge may cause the grill to turn off after connecting to the meat probe.
To see if it’s a problem, touch a grounded frame when you insert or remove an electric cord from the grill.
4- Check for erroneous temperature readings. If the thermometer calibration and readings seem inaccurate, solve the issue with probe calibration.
Don’t worry about how to calibrate a Traeger meat probe. It is easy, especially with the right understanding of thermometer readings.
Traeger Meat Probe Replacement
Before thinking of a replacement, check if you can troubleshoot the problem. Also, note that setting up the probe wrongly may be an issue, and the temperature readings will be automatically wrong.
Check if this could be the issue leading to undercooked or overcooked meat.
If the Traeger meat probe completely fails to work, return it to the store where you bought it and explain the issue. The store will replace those damaged parts.
If there is a warranty on your model, then it may make things easier when trying to get them replaced.
Conclusion: How To Use Traeger Meat Probe
The Traeger temperature probe is perfect if you’re looking to cook meat the right way.
The tool allows continuous monitoring of the meat’s internal temperature to adapt and adjust to the cooking time. However, it can result in various problems and challenges that discourage many interested users.
If you are one of those who were wondering how to use Traeger meat probes without problems, this article is of great use to you.
It shows how most of the problems people encounter while using the device can be easily addressed.
If you have a Traeger meat probe, how to use it should no longer be a bother. Follow the above-discussed steps in instructions and troubleshooting tips and you will overcome the problems and you will get the best result for your barbeque.
Do you leave Traeger meat probe in while cooking?
Yes, Taeger temperature probes are designed to be left in the meat so that you can monitor the temp without opening the lid.
The meat probe is designed to monitor the internal temperature of the meat. If you keep the meat probe inserted throughout the cooking process, you can accurately monitor the temperature without the need to open the grill lid frequently.
This helps maintain a consistent temperature and reduces the risk of overcooking or undercooking the meat.
How to use a meat probe on Traeger Pro 22?
To use the meat probe on the Traeger Pro 22, follow these simple steps.
First, ensure that your grill is set up and ready for cooking.
Next, locate the meat probe port on the front control panel or inside the hopper area of your Traeger Pro 22.
Gently insert the metal end of the meat probe into the port until it is securely in place. Prepare your meat by seasoning it to your liking and then place it on the grill grates.
Make sure to insert the meat probe into the thickest part of the meat, avoiding any bones or excessive fat.
Turn on the grill and set the desired temperature using the control panel. As the grill heats up, the meat probe will begin monitoring the internal temperature of the meat. You can easily track the temperature reading on the control panel throughout the cooking process.
How to use meat probe on traeger tailgater?
To use the meat probe on your Traeger Tailgater pellet grill, start by plugging it into the designated port near the control panel.
Next, prepare your meat, season it to your liking, and insert the probe into the thickest part of the meat without touching any bones or gristle.
Turn on your grill and set the desired cooking temperature, making sure it matches the target temperature for your meat.
As the grill cooks, monitor the meat’s internal temperature on the control panel, and wait for it to reach your desired level of doneness.
Once achieved, carefully remove the meat from the grill, and remember to clean the meat probe thoroughly before storing it for future use.